It can be challenging to maintain your WordPress media library after your site has been live for some time. And if you need your media files to be retrieved quickly, you’ll need a streamlined system for saving them.
That is the number one reason why we created CatFolders—so you can easily organize your WordPress media library without it being a tedious task. But what if you accidentally delete some files, a plugin, or a theme and it breaks your site? Or, worst case scenario, your website goes down? For sure, you will need to backup WordPress media library.
After being inspired by the article on tips that every WordPress webmaster should know about, we decided to focus on one more important thing they should know: backing up and restoring their WP media library. Let’s dive in!
Table of Contents
Why Should You Backup WordPress Media Library?
It’s crucial to backup your WordPress media library to protect your website’s content, like images, videos, and audio files, from data loss or corruption. Without a backup, you could lose all of your media files, which could be a significant setback for your website.
There are various reasons why data loss can happen, such as:
- hacking attempts
- server failures
- malware infections
- human error
- or software problems.
Are you already familiar with these setbacks? If not, you’ve come to the right place! Because keeping a backup of your media library ensures that you can quickly restore your files and get the website running again.
Backup and Restore WordPress Media Folder Organization
To export a WordPress media folder structure, follow these steps:
- First, backup your current media folder structure using the Backup and Restore tool in CatFolders Settings. This will save a CSV file to your computer, which contains all the main folders, subfolders, and media attachment IDs.
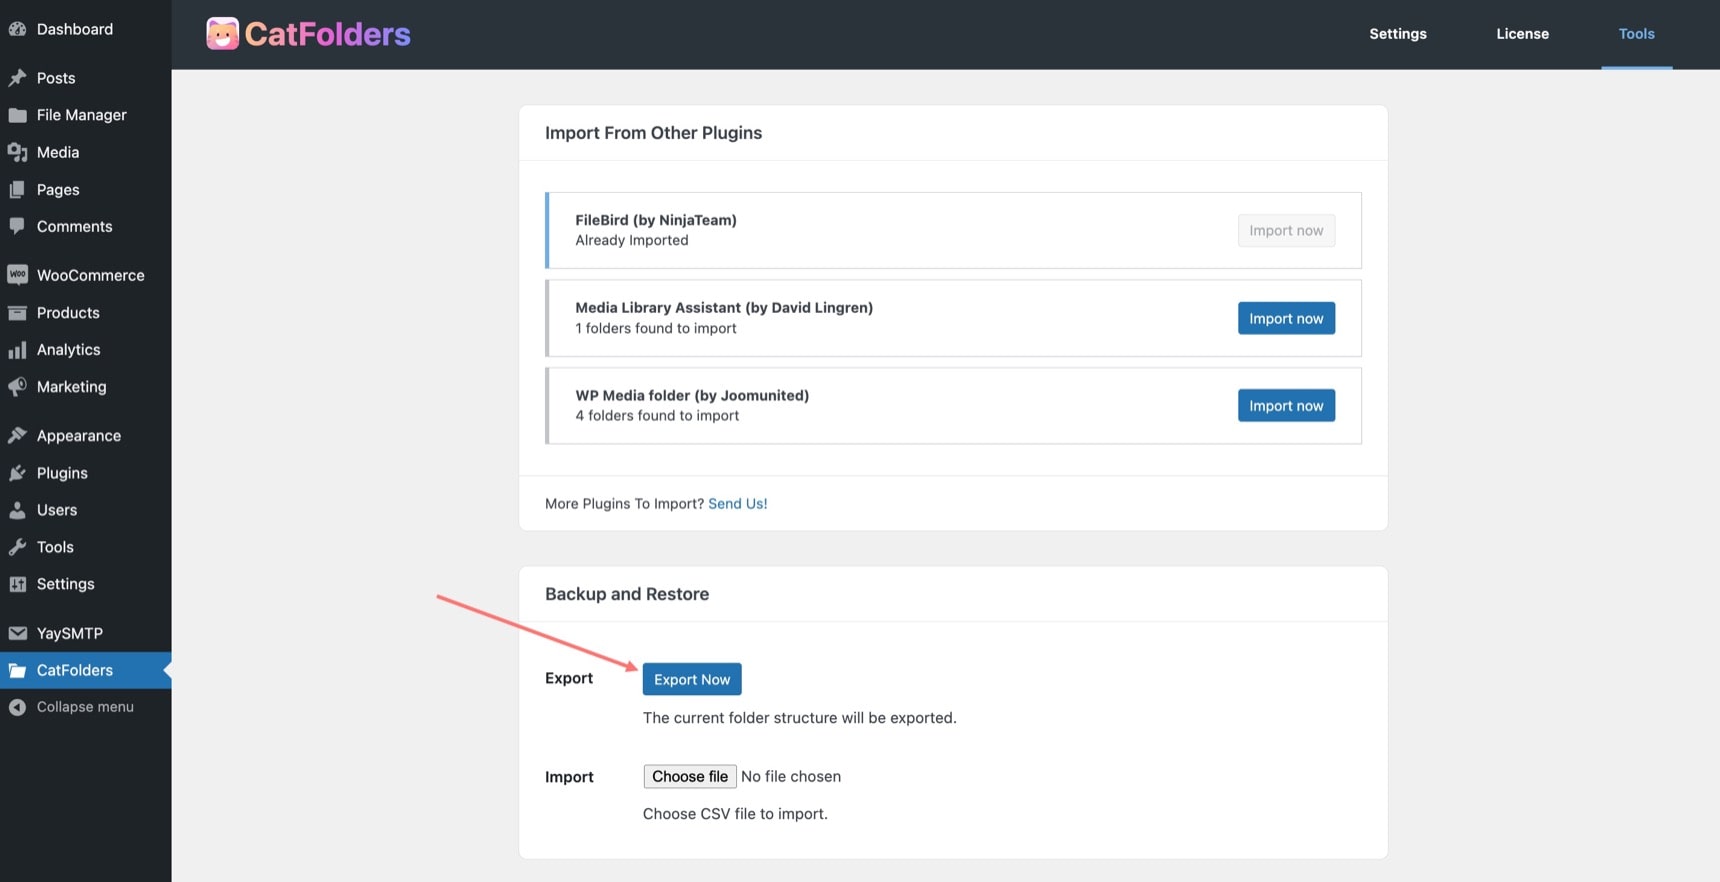
- Then, to restore your folder structure, just import it by uploading the cat_folder.csv file.
- Finally, review your media folders to make sure all categorized files are placed correctly.
It is important to note that importing media files may affect the performance of your site and should be done carefully in a staging environment before executing on the live site.
Modify WordPress Media Folder Organization
While you can just keep the same folder tree when exporting and migrating the WordPress media library, it is possible to modify it and adjust the WP media folder’s access permissions.
For your information, CatFolders provides 2 folder modes:
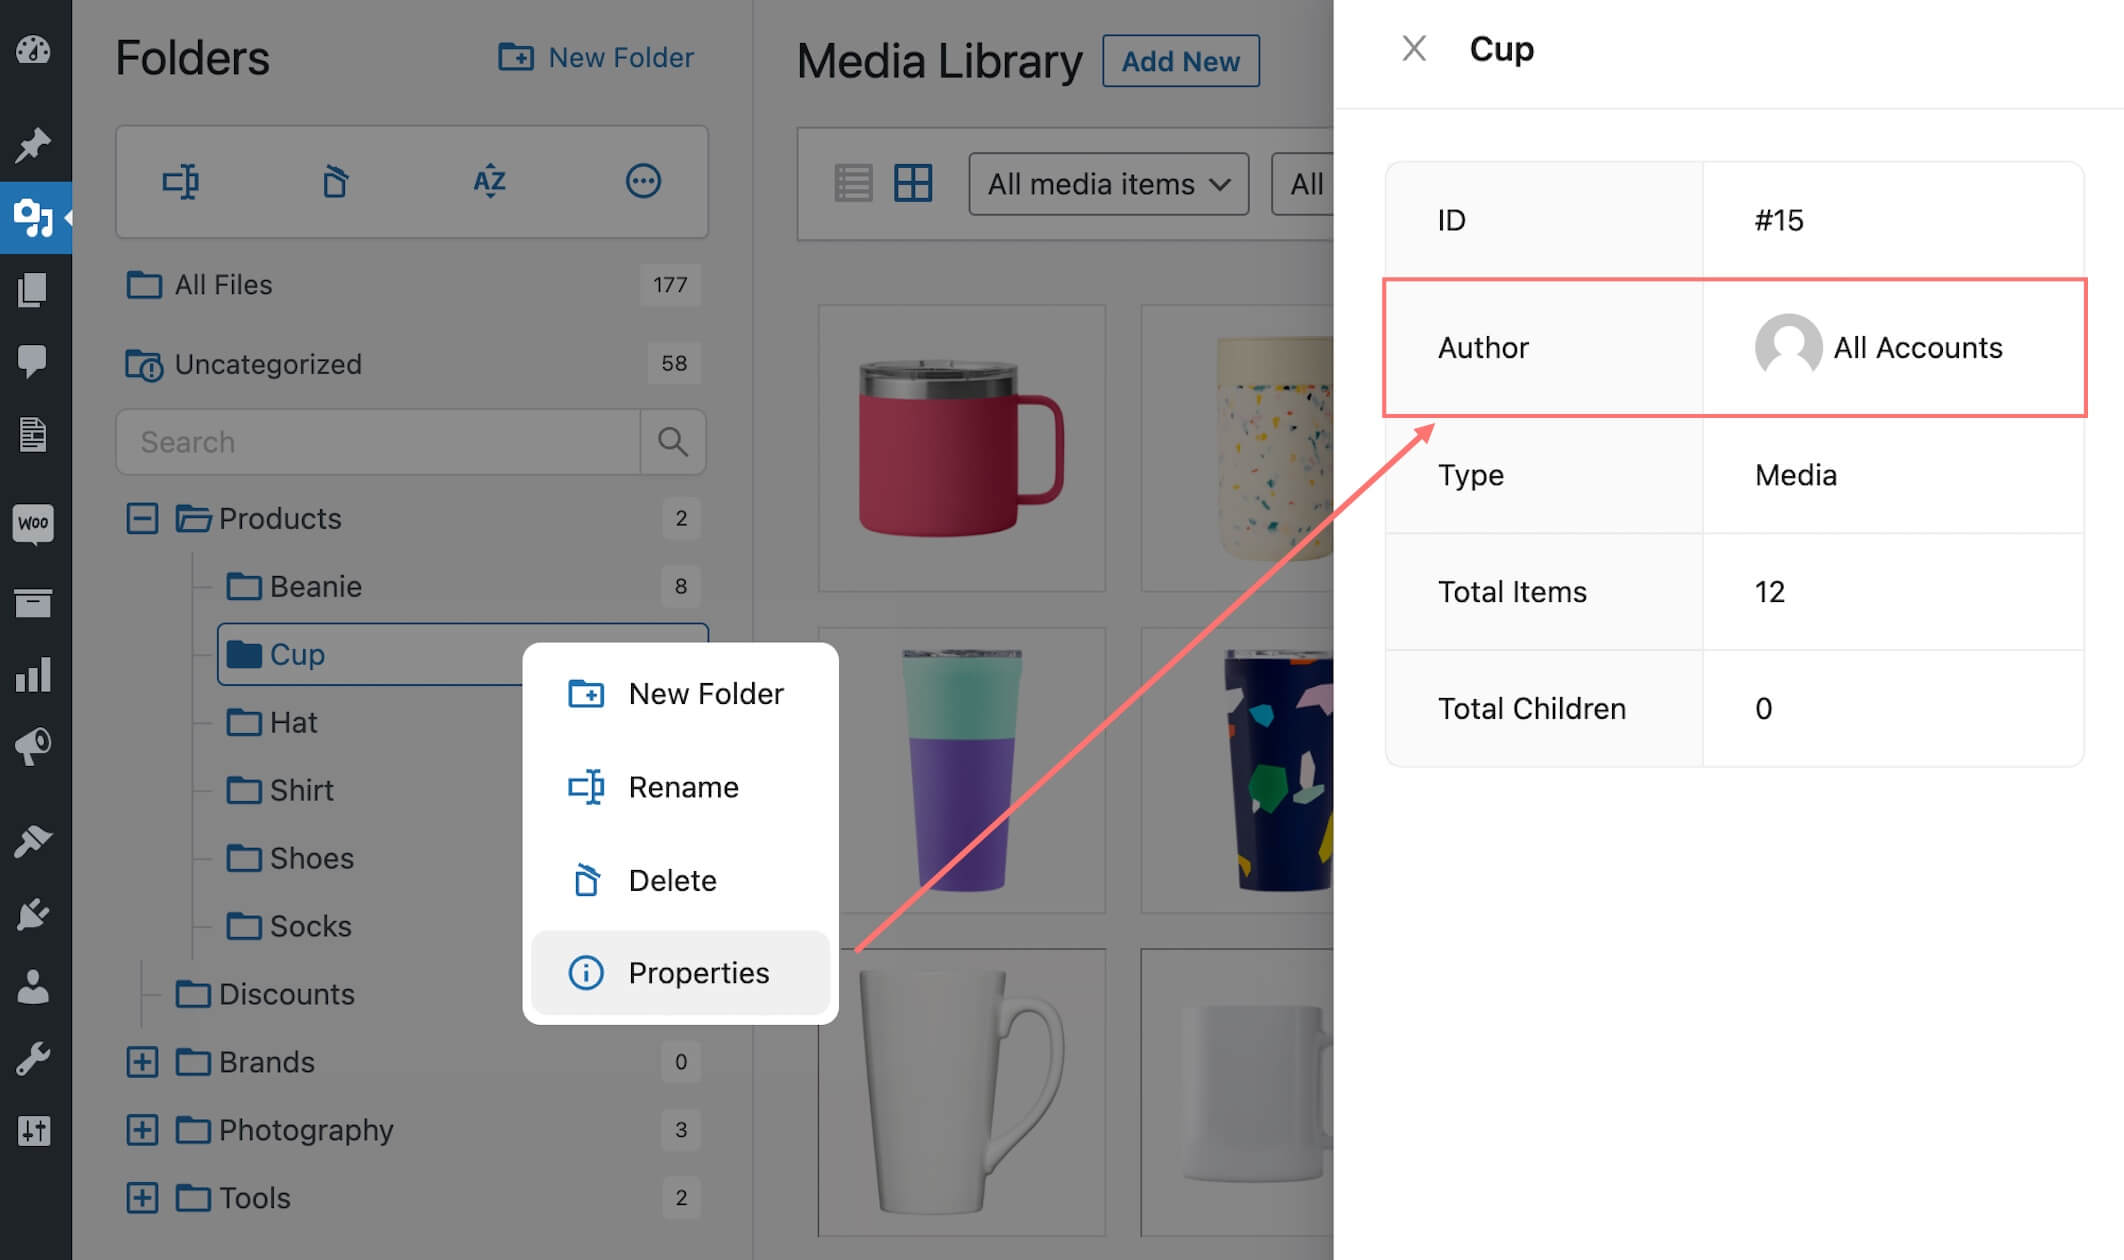
- User-based folder mode: In this setting mode, a folder creator is the folder owner. A folder creator will only see their folders, and cannot access other users’ folder tree.
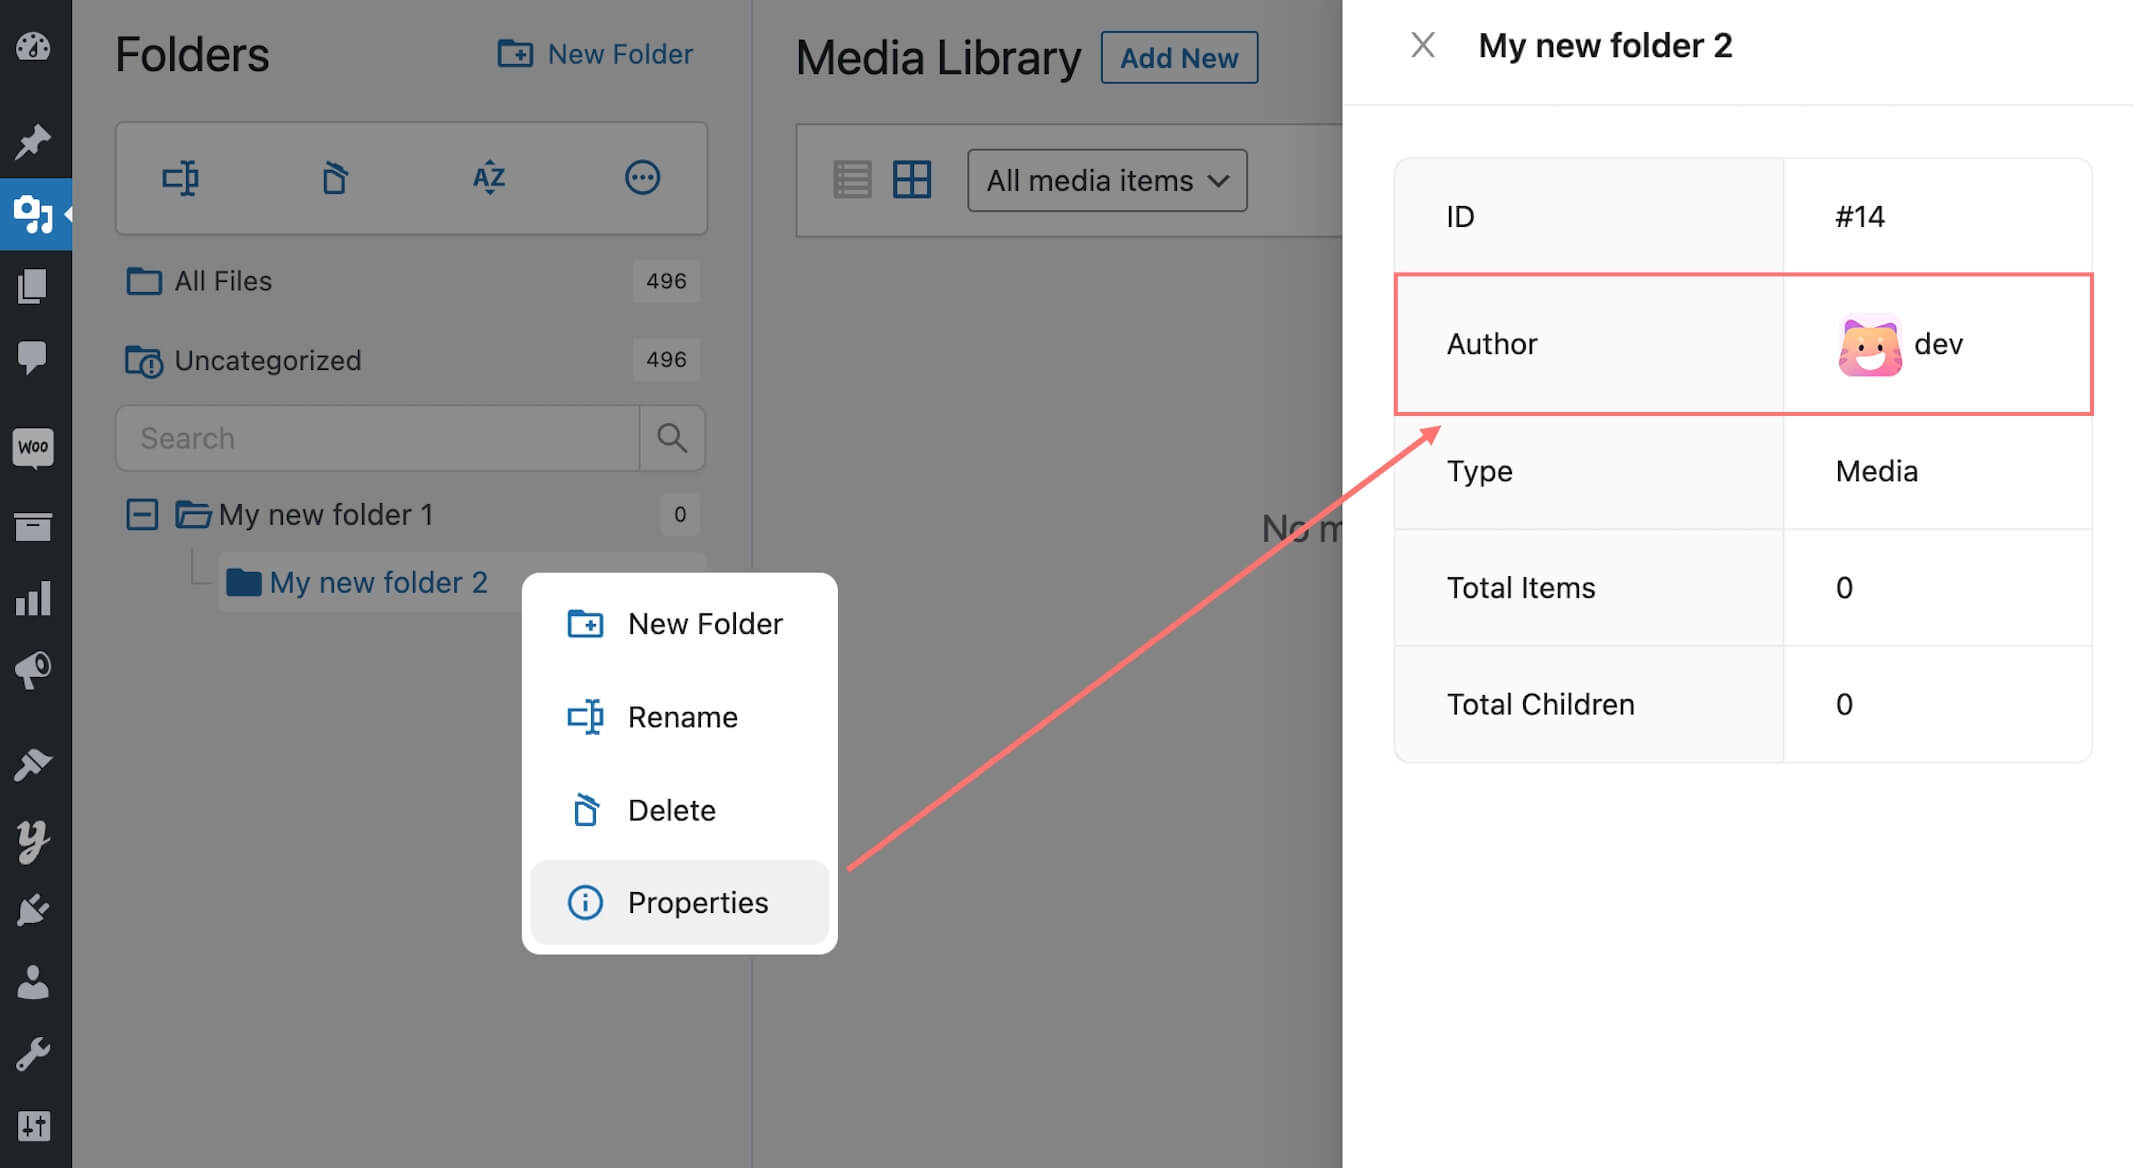
- All-users folder mode: This mode allows any eligible user to create a folder in the common folder tree. Learn more about media folder properties.
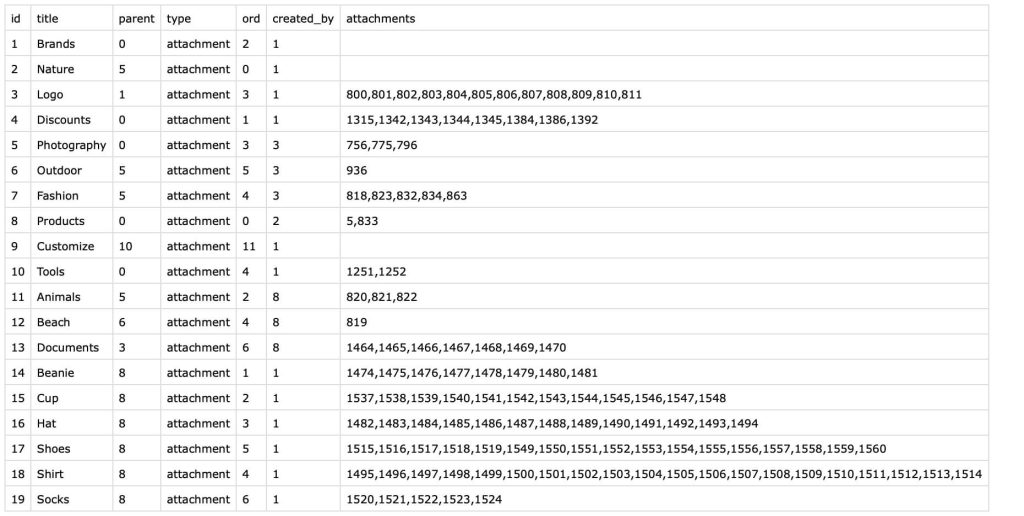
With User-based folder mode, you will have different folder creators in the exported CSV file. Pay attention to the created_by column, you will see it shows the user ID who created specific folders.
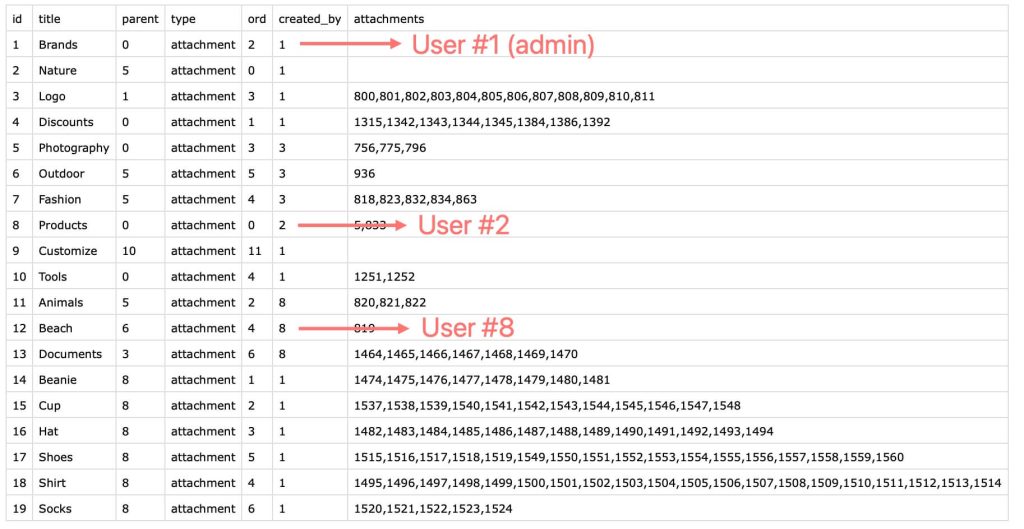
In case you want to transfer those folders to All-users folder mode, just modify the created_by values into zero.
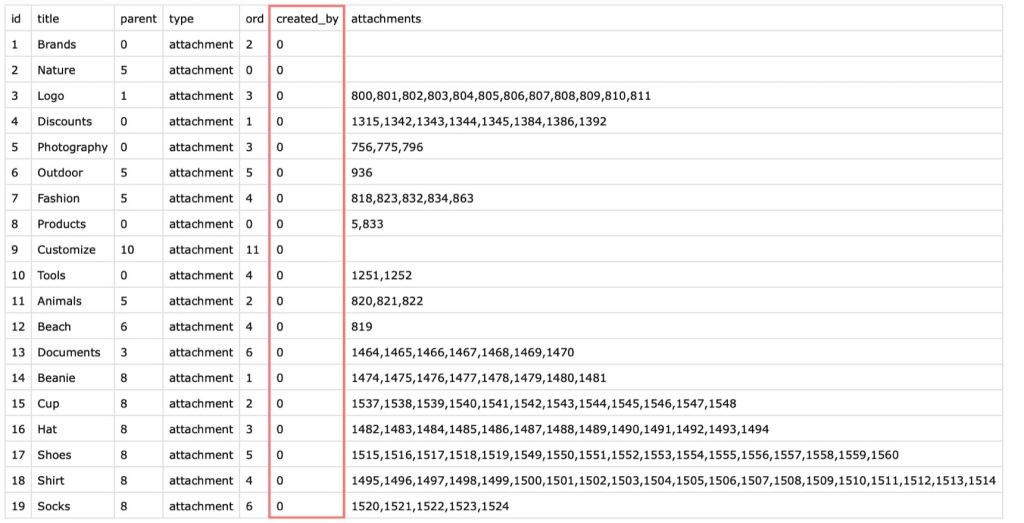
So, if you would like to backup WordPress media library and deploy this new folder tree structure, just upload this CSV to CatFolders’ Backup and Restore tool, and you’re good to go. Now you can have every user in your organization on the same page!
5 Alternative Ways to Backup Your WordPress Media
As you already know, WordPress is mostly about the plugins, but some things can even be done without them. And for us to explain today’s matter, we will focus on four different backup methods that are easy—some of them free, some not—but all of them reliable.
Method #1 Built-in Tools
WordPress has its own built-in export tool that allows you to export:
- Posts and pages;
- Custom fields like products, variations, orders, coupons;
- Comments;
- Users;
- Categories;
- Tags;
- and, of course, the media.
- After you login to your WP dashboard, click Tools > Export and select the Media radio button.
- Select the date range of the files you want to download.
- Click the Download Export File button.
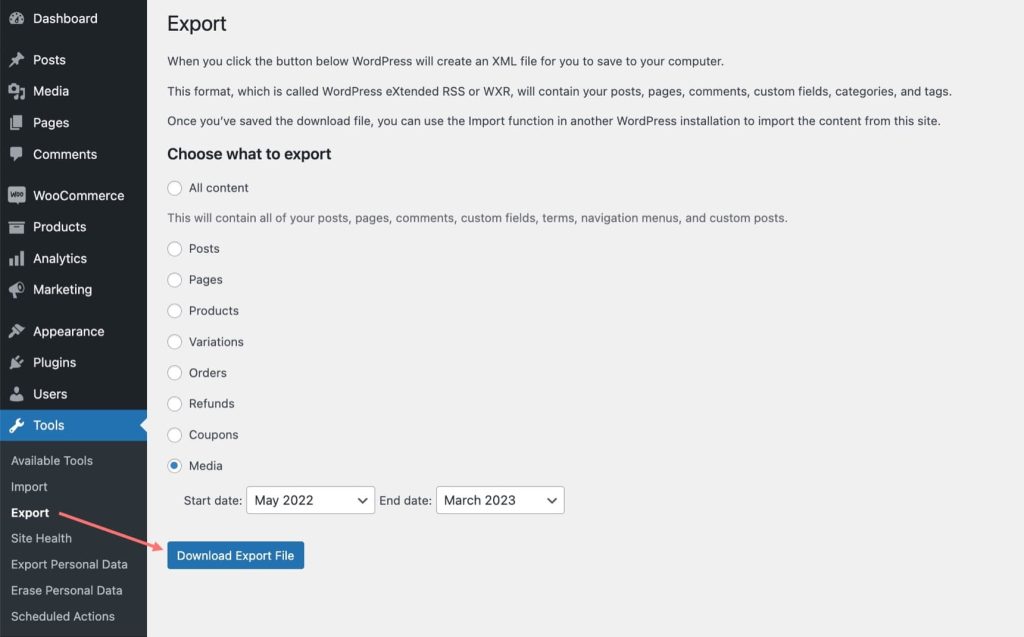
You can then save the resulting data as an XML file on your hard drive. The XML file can then be imported using the WordPress importer tool on another site.
This method appears to be the best option because of how easy it is. However, if your media library is bigger or if your internet connection is particularly slow, the download may time out before it’s finished.
Method #2 File Transfer Protocols
Another simple way to create a backup is to use a File Transfer Protocol (FTP). With a FTP, you can access your website’s content without using an internet browser. The one that WordPress recommends using is FileZilla.
- Once you install it on your computer, open it, and in the top-left corner you will see a text that says “Remote” or “Local site.”
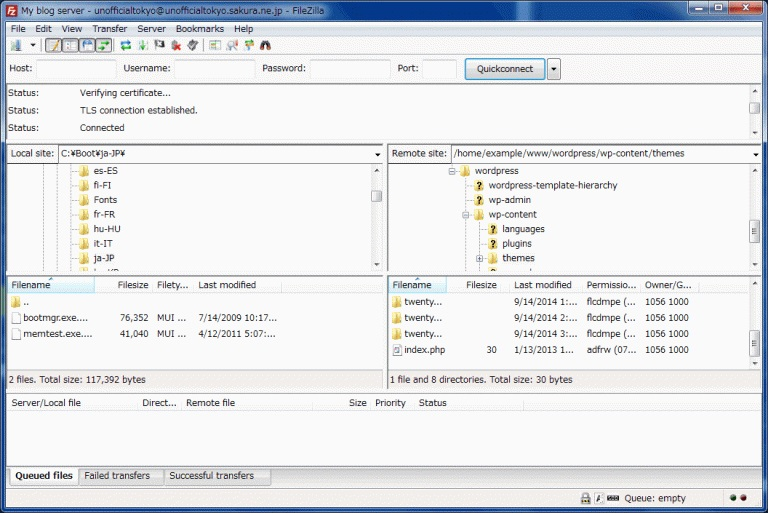
- Click on the wp-content directory.
- Find a folder called “uploads”.
- Simply drag and drop the “uploads” folder onto your computer’s desktop.
As easy as it sounds (and is), backing up your media library via FTP can also be a slower process if the media library is large. Therefore, it may be a better option to rely on a plugin.
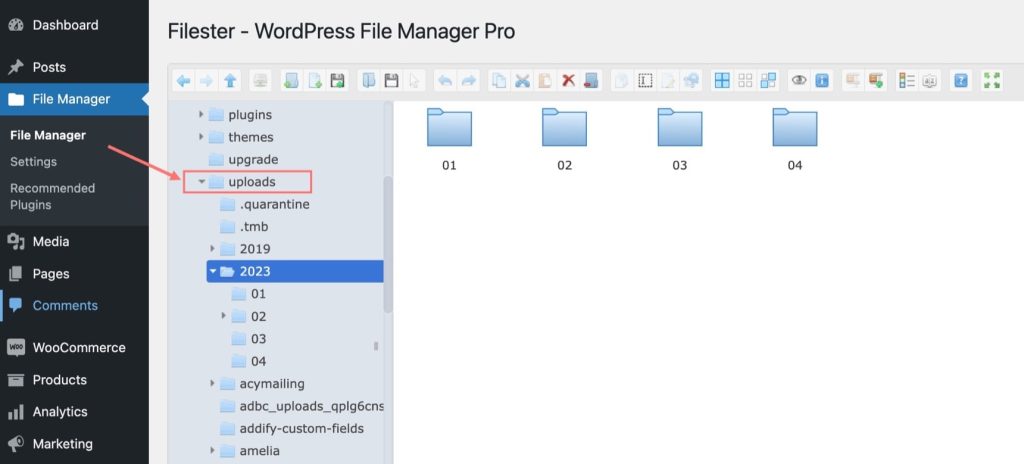
In order to restore your uploads folder without FTP access, it’s recommended that you use a full-fledged plugin like Filester – WordPress File Manager (Pro, yes, but for free!)
Method #3 Free Plugins
If you’re not confident enough and think you’ll mess up something in the settings, you can always install a plugin that will pretty much automate the process.
There are different ones you can find online, but most of the time people will recommend the Export Media Library plugin. With it, the files can be easily downloaded on your computer.
After it’s installed and activated:
- Go to the Media > Export page from your admin sidebar area.
- Access the “Export Media Library” page
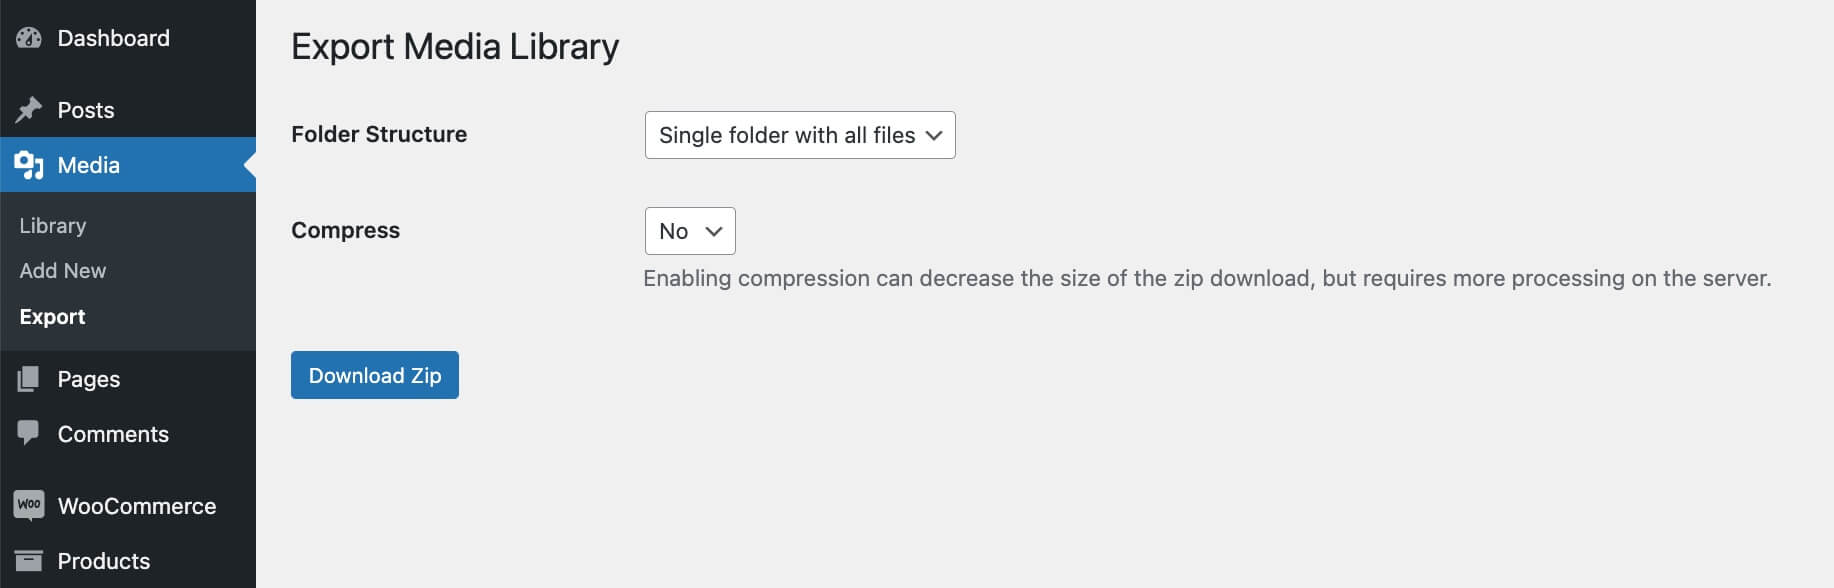
- Select the “Single folder with all files” option from the drop-down menu next to the “Folder Structure” option.
- Select the “Single folder with all files” option from the drop-down menu next to the “Folder Structure” option.
In case you want your media to be organized into different folders according to the time it was uploaded, select the “Nested Folder” option from the drop-down menu.
Click the “Download Zip” button, and all of your media library’s content will be downloaded to your computer, all of them in their original file types.
Method #4 Paid Plugins
There are many paid plugins for backing up and restoring the media library automatically, but Jetpack is one of the most popular ones. It enables you to schedule regular backups of your WordPress media library. Not only does it automatically create copies of your website, it also allows you to restore it to any previous state.
Jetpack can backup WordPress media library and much more:
- All the pages, posts, as well as media files stored in your wp-content folder;
- The root-level WordPress files;
- Every installed theme and plugin;
- Your site’s WordPress database (SQL).
With this plugin, backups occur whenever any changes are made to the site, typically 24 hours after the last one.
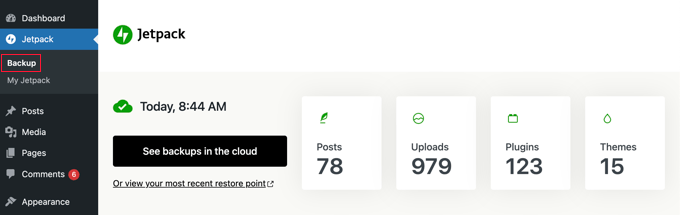
After you install it, you can find backups in the Activity Log on your WordPress.com dashboard.
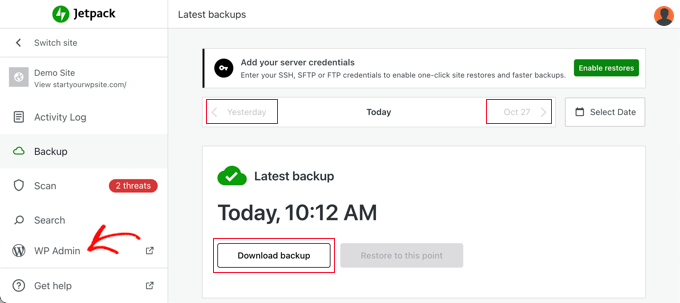
If you’d like to save a copy of your site from the backup, you can do so using the Download backup option. After the backup has been made, you will receive an email with a download link and the option to download the data directly from your browser.

When you want to restore your site to a previous state, go to Jetpack > Backup and choose the backup you’d like to use.
Or go to Jetpack > Activity Log and narrow down the backup you’d like to restore by date range and activity type.
You’ll be asked to verify which sections of the site you want to bring back online. Keep in mind that your previously installed plugins and theme settings will not be restored, so you will need to work on that. But as for the media files, be aware that any content added after the backup has been created may be lost.
After you click Confirm Restore, the site will be restored. You will receive a message that the process of restoring your site has begun. You will receive an email once the process is complete.
Depending on the size of your site, backups can take anywhere from a few minutes to a few hours to finish.
Other plugin alternatives, if JetPack doesn’t seem to fill your needs, include UpdraftPlus and BackupBuddy.
Method #5 Use WP Umbrella to Backup and Restore Your Media Library
WP Umbrella is another efficient way to handle the backup and restoration of your WordPress Media Library, and guess what, it’s user-friendly too! This plugin specializes in backups, plugin management, real-time monitoring, and even performance checks. So, you’re not just backing up your media files; you’re getting an umbrella (pun intended!) of services.
Steps to Backup with WP Umbrella
- Install the Plugin: Head to your WordPress dashboard, go to ‘Plugins > Add New’, search for ‘WP Umbrella’ and install it.
- Activate and Setup: After installing, activate the plugin. You’ll be prompted to set up an account or link an existing one.
- Navigate to Backup Section: Once you’re in, find the backup section within the WP Umbrella dashboard.
- Select Media Files: You’ll see options to backup various components of your website. Choose ‘Media Library’.
- Start Backup: Click on ‘Start Backup’ or the equivalent button to initiate the process. You’ll see a progress bar, and once it reaches 100%, your media files are safely stored.
How to Restore Your Media Library
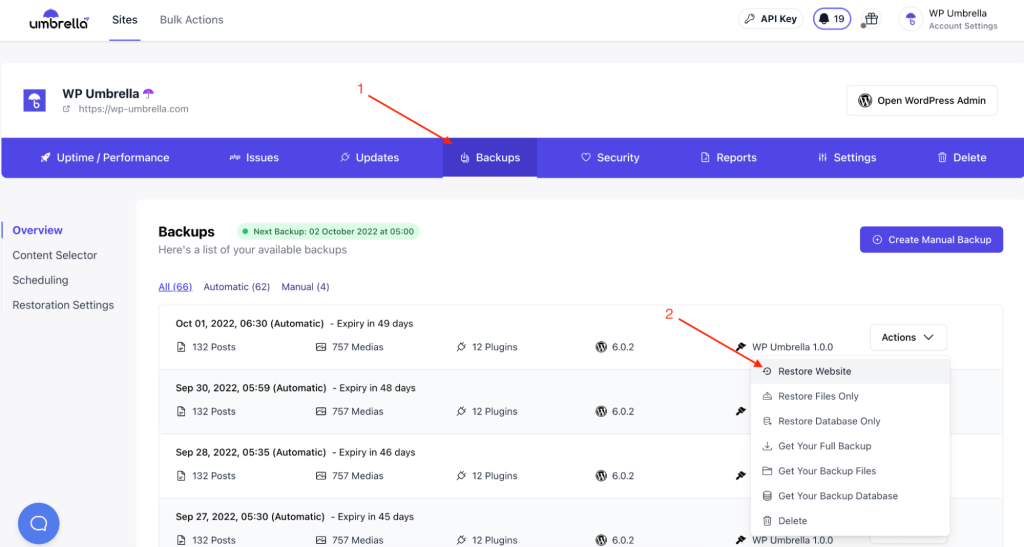
- Access Your Backups: Head back to WP Umbrella’s dashboard and go to the ‘Backups’ tab.
- Choose Your Backup: You’ll see a list of all your backups. Select the one you want to restore.
- Verify: A popup will appear, confirming if you want to restore the selected backup. Confirm to proceed.
- Wait for Restoration: The plugin will do its magic. Once it’s done, you’ll get a notification saying your media library has been successfully restored.
Pros and Cons
- Pros:
- Easy to use, with a straightforward UI.
- Offers real-time monitoring and performance checks along with backups.
- Allows for scheduling backups.
- Cons:
- No free tier
- If you’re only interested in media files, this might be a bit of an overkill since it offers a whole lot of other features.
WP Umbrella’s holistic approach towards website management makes it a strong candidate for not just backing up your media files, but also for ensuring your site’s overall health. So if you’re looking for a one-stop shop, this might be your jam!
And there ya go, you’ve got five solid methods to choose from now! 🌟
Better Be Safe Than Sorry!
In conclusion, protecting and prolonging the life of your website’s content requires that you regularly backup WordPress media library. You can undo any blunders or changes you make to your WordPress media library by restoring an older version from a backup.
Any additional help you might need regarding website creation you can find on web design agency Chicago.
Whether you’ve just created your first WordPress site and need a little bit of guidance, or you’re already a veteran in the field, these methods will help you save the integrity of your website’s content and protect it from any potential threats out there.
It is now your turn to select the method that best suits your needs!