WordPress is a popular platform for creating and managing websites, and it’s no secret that media files like images and videos can significantly slow down your website’s loading time. This is where offloading WordPress media comes in – the process of storing your media files on an external server instead of your WordPress hosting server.
Offloading your media files can help reduce the load on your server, speed up your website’s performance, and provide better scalability.
In this blog, we will discuss how to offload media in WordPress using an offload WordPress speed optimization plugin. We will explore the benefits of offloading, how the plugin works, and the steps you need to follow to get started with offloading your media files in WordPress. By the end of this blog, you’ll have a better understanding of how offloading can help optimize your WordPress website and how to implement it using the most effective plugin Next3 Offload.
Table of Contents
What is Offloading Media in WordPress?
Offloading media in WordPress means transferring media files like images, videos, or other files on a server such as a cloud storage service or a content delivery network (CDN). This offloading process can usually be done by a plugin that can connect a WordPress site to the server that automatically uploads any media files.
You can improve your website performance and speed by offloading your media files to a server. By offloading your media files, you can reduce the amount of storage space your website uses on your web host’s server, which can improve website performance and speed.
Offloading media can also help to ensure that your media files are always available and accessible to your website visitors, even if your website experiences high traffic or is temporarily unavailable.
Importance of Offloading Media Files in WordPress?
Offloading media files can help prevent your website from running out of storage space, which can slow down its performance and make it difficult to use. It can also be a way to back up your files, in case your original device is lost, stolen, or damaged.
Offloading media is a useful way to manage your digital files and ensure that you have enough space to store new content. Offloading media in WordPress can be a useful strategy for improving website performance, reducing costs, and providing a better user experience.
Let’s see the several benefits of WordPress speed optimization plugin for website owners.
- Improved website performance: Storing media files on a remote server can reduce the load on your web host’s server, which can improve website speed and performance. This is because media files can be accessed and loaded more quickly from a CDN or cloud storage service than from your website’s hosting server.
- Reduced storage costs: Offloading media can help to reduce the amount of storage space your website uses on your web host’s server. This can be especially useful for websites that have a lot of high-quality media files, as these can quickly take up a lot of space.
- Increased scalability: By using a CDN or cloud storage service to offload media, your website can be more easily scaled to handle large amounts of traffic. This is because these services can distribute your media files across multiple servers, making it easier to handle spikes in traffic.
- Better user experience: Faster website speeds and improved performance can lead to a better user experience for your website visitors. This can help to increase engagement and reduce bounce rates.
What is the Easiest Way for Offloading Media Files in WordPress?
Offloading media in WordPress can improve website performance and reduce hosting costs. The easiest way to offload media is by using a plugin that automates the process. This allows you to transfer your media files to a remote server, such as a CDN or cloud storage service, with minimal effort.
To get started, choose a plugin that supports media offloading and install it on your WordPress site. Most plugins will require you to set up a connection to your remote server by entering your server credentials and configuring some settings. Once the connection is established, the plugin should automatically offload any new media files you upload to your WordPress site.
Some plugins may also offer the option to offload existing media files in bulk, which can be useful if you have a large library of files that you want to transfer to the remote server.
After the media files are offloaded, you can verify that the process was successful by checking your WordPress media library. Instead of pointing to your hosting server, the links for each media file should now point to the server.
By using a plugin for offloading media files, you can simplify the process and ensure that your media files are always available to your website visitors, even during periods of high traffic. This can help to improve website performance, reduce costs, and provide a better user experience.
Now the most important thing is when are you ready to add a plugin to your WordPress website for offloading media files then first of all you have to select a suitable plugin.
The plugin must have to be able to fulfill all offloading requirements and must obtain some important features. In that case, as a frequent user, I’ll recommend Next3 Offload as it is the most user-friendly and feature-rich offload WordPress speed optimization plugin.
How can You Offload Media Files with Next3 Offload?
Next3 Offload is a WordPress plugin that allows you to offload media files to cloud storage services, such as Amazon S3, DigitalOcean Spaces, or Google Cloud Storage. Here are the steps to follow to offload media with the Next3 Offload plugin:
- Install and activate the Next3 Offload plugin on your WordPress site.
- Go to the plugin’s settings page and choose the cloud storage service you want to use. Enter your cloud storage credentials to connect your WordPress site to your cloud storage account.
- Configure the plugin’s settings, such as the storage bucket name, folder structure, and cache settings.
- Once the plugin is set up, all new media files that you upload to your WordPress site will be automatically offloaded to your cloud storage account. You can also choose to offload existing media files by running the plugin’s bulk offload feature.
- Check your cloud storage account to ensure that your media files have been successfully offloaded. You should see your media files stored in your cloud storage account instead of your WordPress hosting server.
By using the Next3 Offload plugin, you can easily and automatically offload your media files to a remote cloud storage service. This can help to reduce the load on your WordPress hosting server, improve website performance, and reduce hosting costs.
How to Offload Media Files to Amazon S3?
You can easily offload your WordPress Media Library to Amazon S3 by accessing Next3 Offload in the most prominent way.
You need to follow some steps to use Amazon S3 provider.
- Install the plugin Next3 Offload.
- Collect an active license.
- Log in to the AWS Console.
- Save all the details of AWS User’s access details.
- Select the provider Amazon S3 from Dashboard.
- Insert the given Access Key ID.
- Enter the given Secret Access Key.
- Now you can offload all media files and create buckets.
Create an IAM User
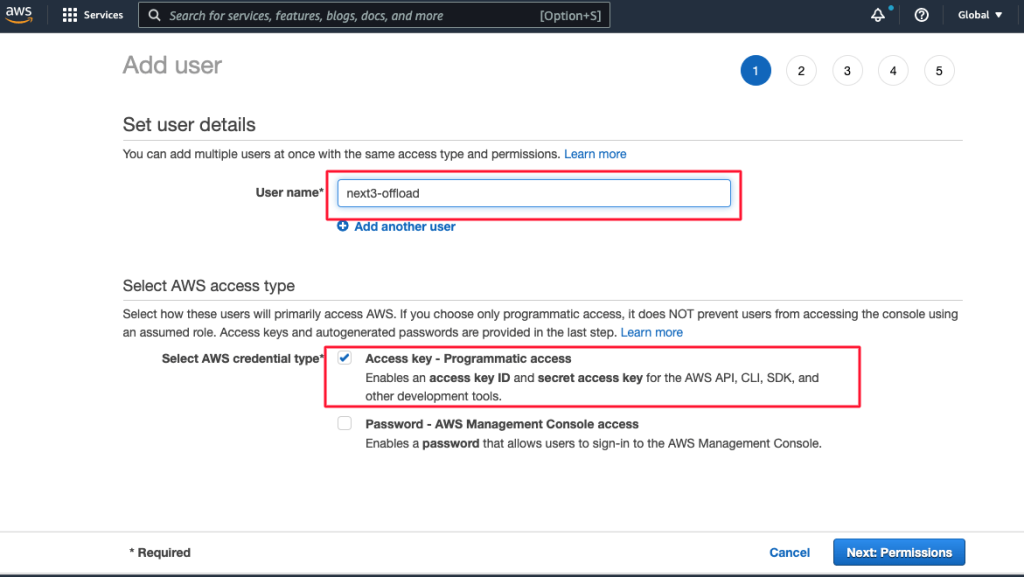
After logging into the console, you have to create a new IAM user.
In the User name field, insert the user’s name.
Names must be unique inside your AWS account as the names are case-sensitive. Up to 64 letters, digits, and the following characters can be used in user names: plus (+), equal (=), comma (,), period (. ), at sign (@), and hyphen (-).
Click the Next: Permissions button after selecting Programmatic access under Access type.
You must offer the new user particular permissions in order to let it manage buckets and objects in the S3 service.
We advise granting the new IAM User sole access to S3 for the sake of this fast-start tutorial. When configuring Next3 Offload Media for the first time, using the “AmazonS3FullAccess” policy helps prevent potential issues; however, experienced AWS users may want to utilize a Custom IAM Policy. Any IAM User’s policy can be changed at a later time to limit access to the resources needed by Next3 Offload Media alone.
After selecting “Attach existing policies directly,” type “s3” into the filter policies entry box.
At the bottom of the screen, select the “AmazonS3FullAccess” policy before clicking Next: Tags.

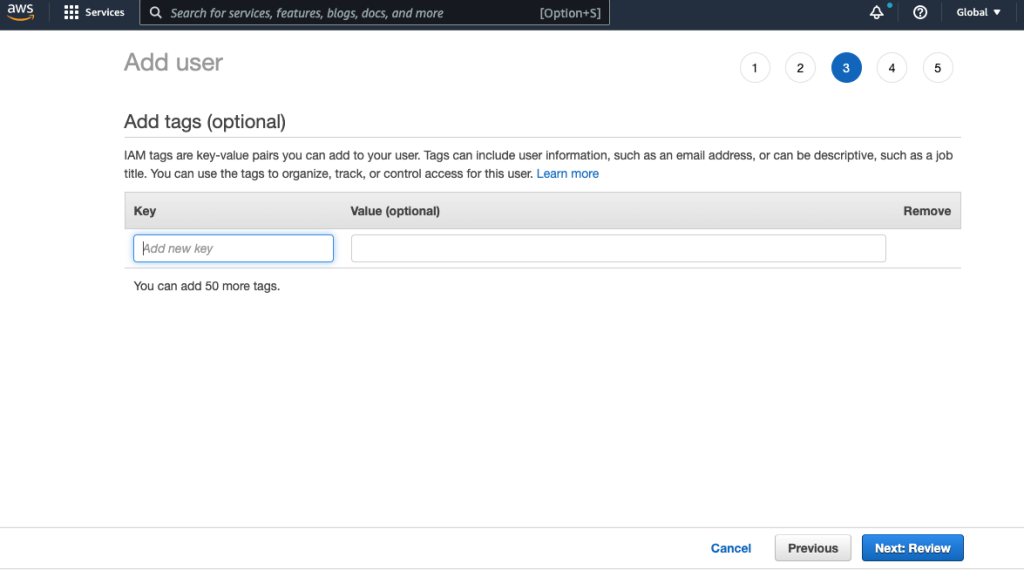
It is entirely up to you whether or not to add tags. But, if you frequently use AWS, you may find that doing so will facilitate administrative tasks. Click the Next: Review button at the bottom of the page whether or not you add tags here to proceed.
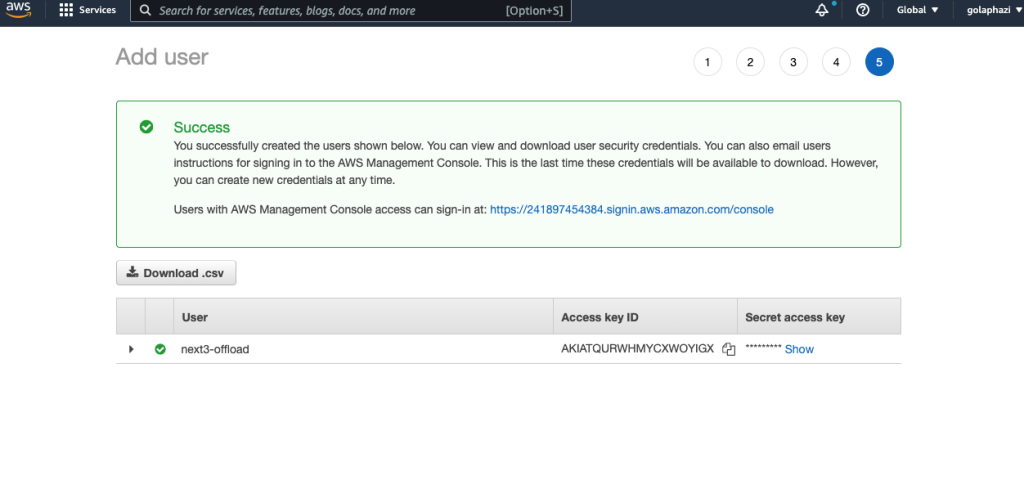
If everything appears to be in order, select the Create user button.
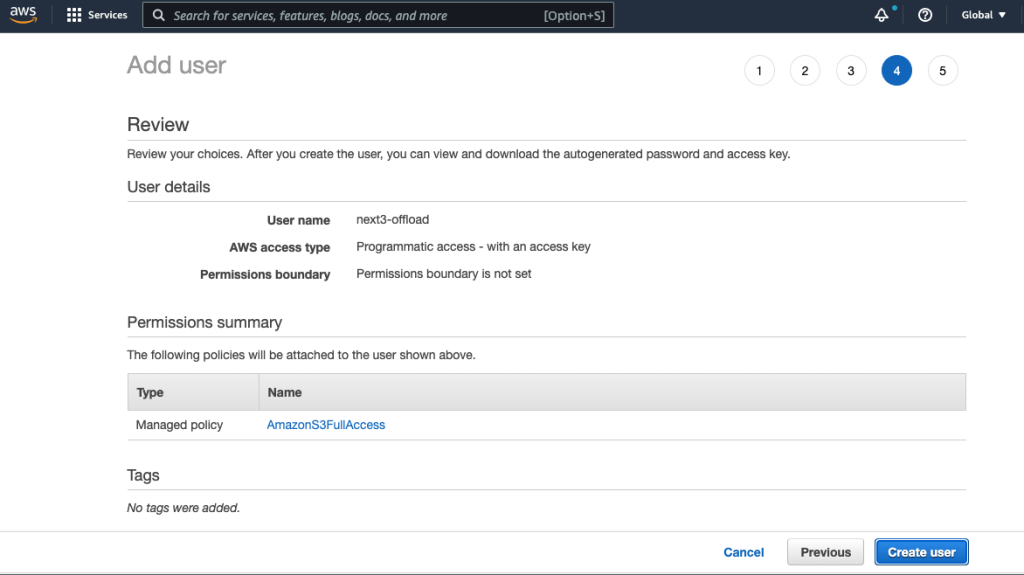
You will be shown the user’s security credentials, which are made up of a Secret Access Key and an Access Key ID. Please download these as a CSV file and copy them to a secure location because Amazon won’t display them again. The secret key cannot be retrieved again if you lose them; however, you can always create a fresh set of keys from the console.
How to Offload Media Files to Google Cloud?
Do you want to offload your WordPress media files to Google Cloud Storage? Then Next3 Offload will provide you with the easiest way to connect with Google Cloud Platform.
Let’s start a guide that will assist you to create connections with Google Cloud Platform.
Follow the steps:
- Install the plugin Next3 Offload.
- Collect and activate the license.
- Login to the Google Cloud Platform Console.
- Generate a Service Account Key File for GCS.
- Save the Service Account Key File Details.
- Configure Next3 Offload Media for offloading WordPress media files.
- Select the provider Google Could.
- Create or select a bucket to offload files.
Create Google Cloud Service Account Key File
After logging in to the console, you have to create a new Service Account Key and save the files.
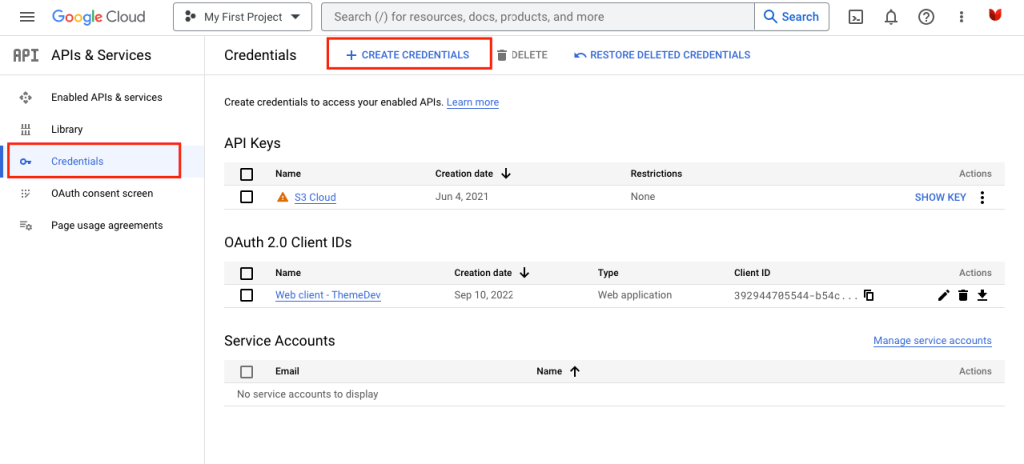
Go for the Credentials section of the API & Services page in the console. Then click on the Create Credentials button.
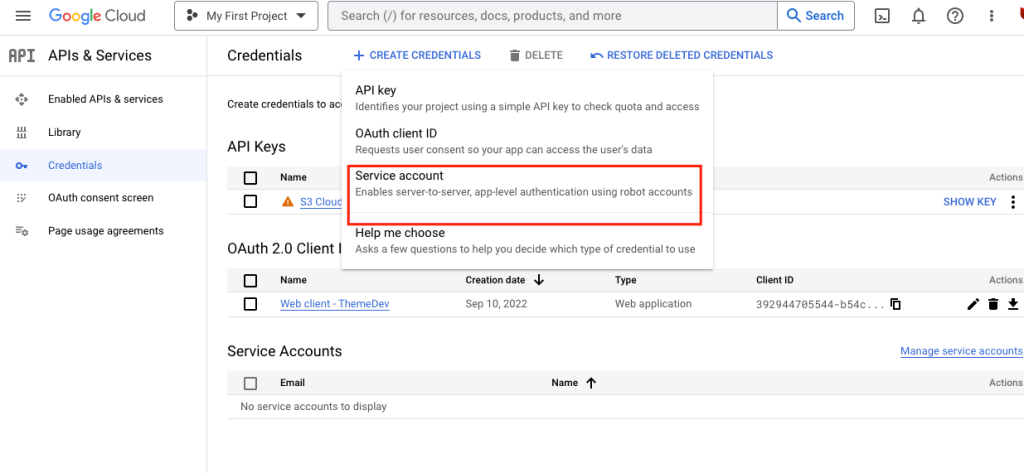
This section will appear after clicking on Create Credentials. Select Service Account.
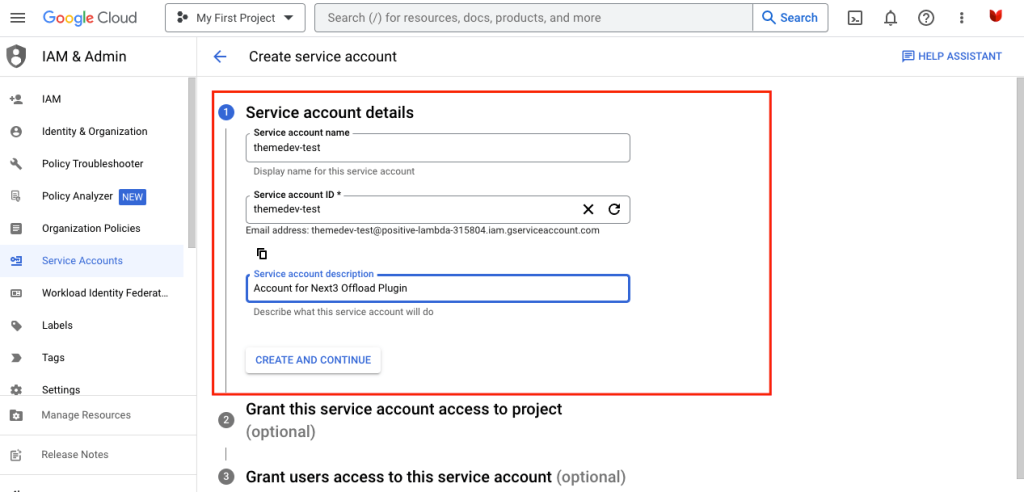
Then provide all service account details. Like service account name, ID, description. After providing all these, click on Create and Continue.
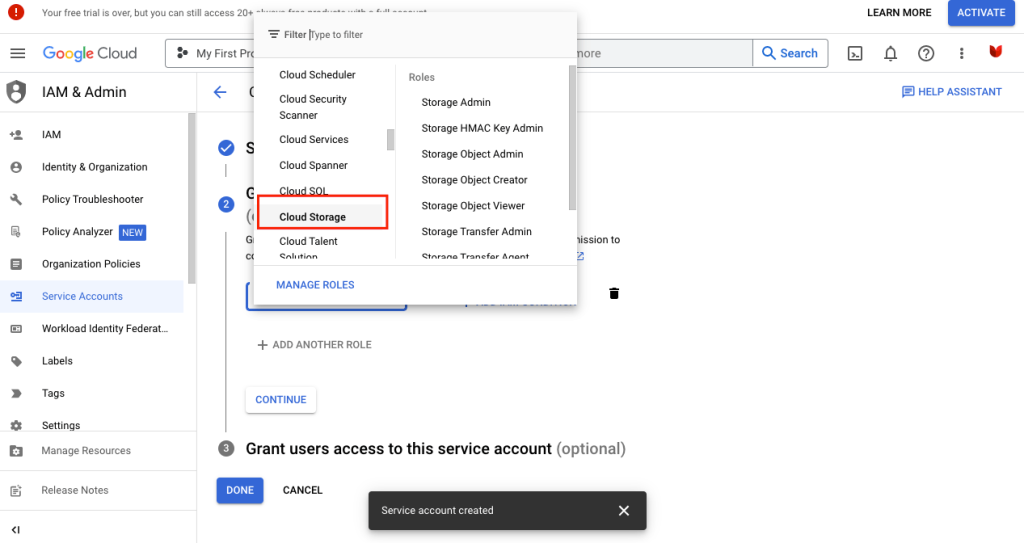
Click the Select a role dropdown. Choose “Storage Admin” after selecting “Cloud Storage” by Under product or service. Next3 Offload will be able to create buckets for you and manage the objects in the bucket if you have the Storage Admin role.
After completing click Done.
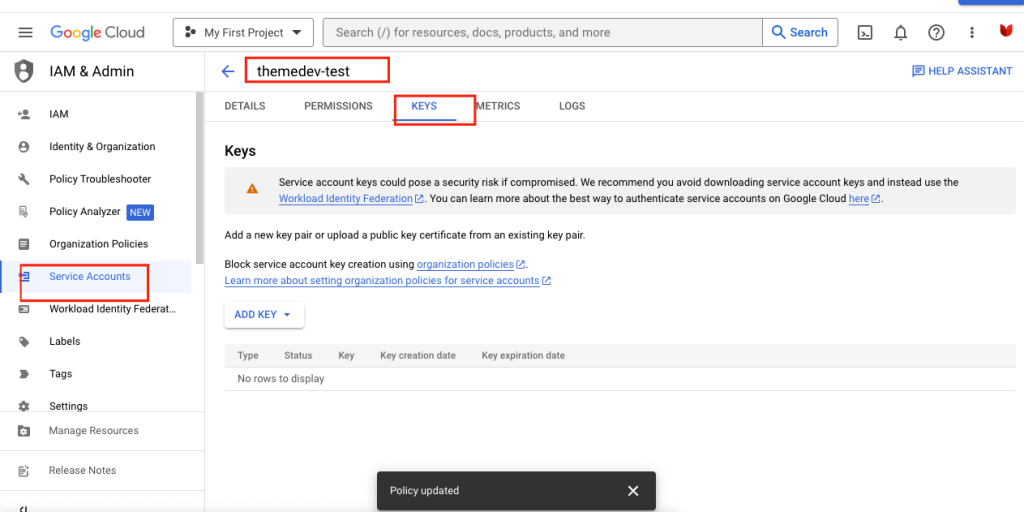
Click the newly created service account at the bottom from the Credentials page. Click Keys, then select Create new key.
Configure Next3 Offload
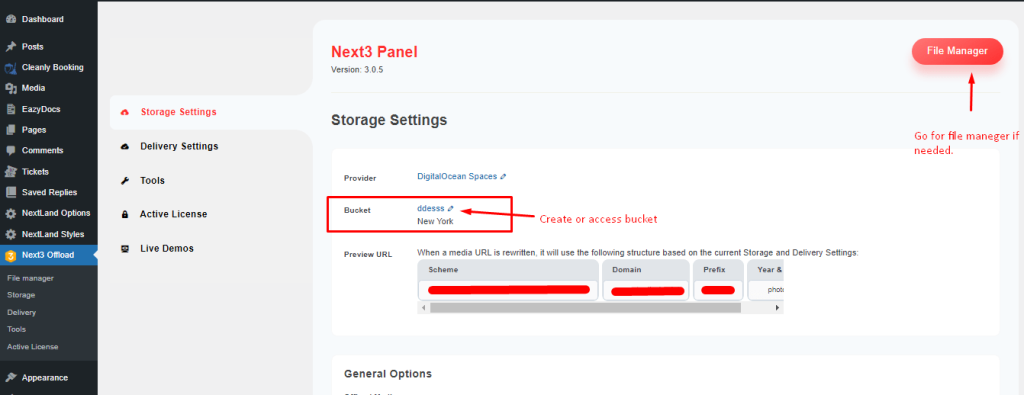
After selecting the provider Google Cloud Storage, you have to create a bucket or access an existing bucket to offload media files.
For this go for Storage Settings in Next3 control panel and click on edit option beside Bucket.
How to Offload Media Files to The Digital Ocean?
This documentation will support you to know details about offloading your WordPress Media Library to Digital Ocean.
Are you using Next3 Offload to offload your WordPress media library? You can offload your WordPress media library with both Amazon S3 and Digital Ocean. The Offloading process is very much easy with Next3 Offload to Digital Ocean. You just need to know some basic steps.
Let’s see the steps to offload WordPress media library in Digital Ocean.
- Install the plugin Next3 Offload.
- Collect and activate the license.
- Login to the DigitalOcean Control Panel.
- Generate and save DigitalOcean Spaces Access Keys and Secret Key.
- Save the accessing details for Next3 Offload.
- Select the Provider DigitalOcean from Next3 Offload’s control panel.
- Provide the saved access key details.
- Configure Next3 Offload to offload all media files to Digital Ocean.
- Create a new bucket or access existing buckets to offload files.
Create Access Key
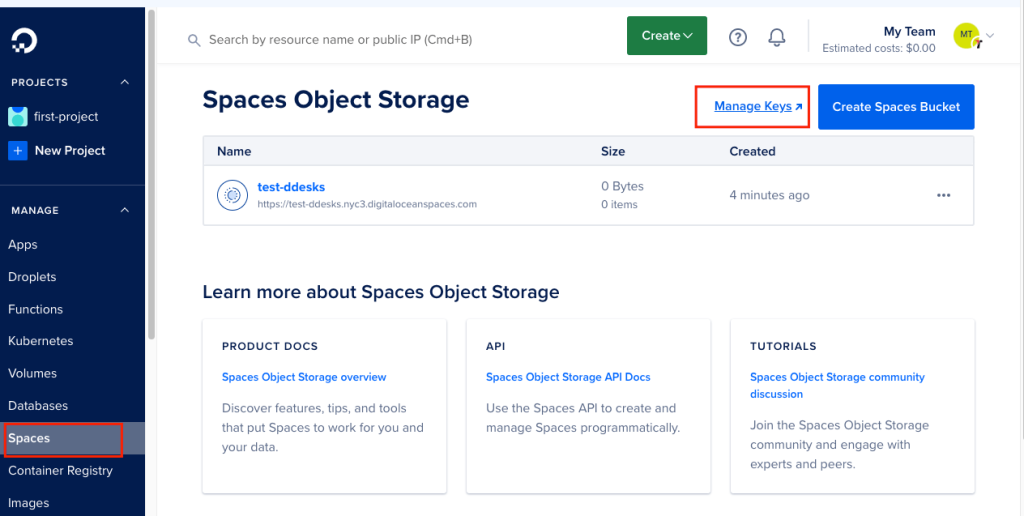
After creating an account, login to the DigitalOcean Control Panel to create Access Keys for Spaces.
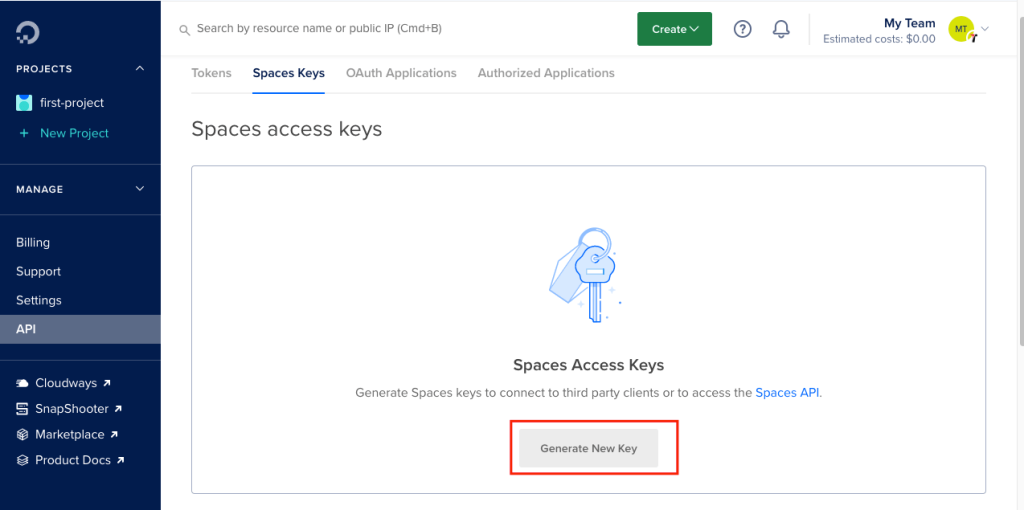
Here in the following image you can see, after logging in a control panel will appear. Go for Spaces and click on this tab. From the left beside Spaces Object Storage select the Manage Keys button.
Then from the Space Keys section scroll down and click on Generate New Key.
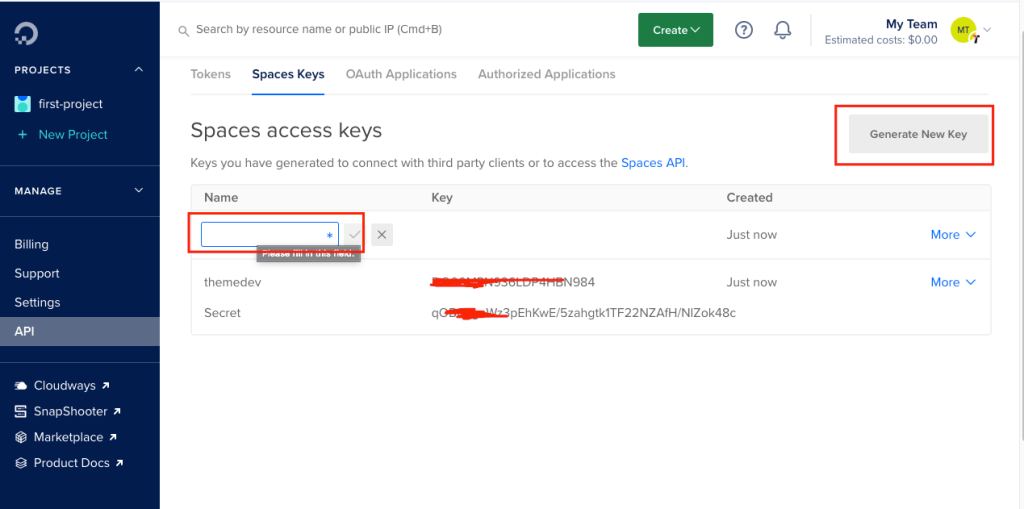
Insert a particular name for the new Access Keys to make it unique and recognizable. Then click on the “ Tick” button to save the name.
After that, you will be shown the security credentials for the access keys. Here you will have an Access Key ID and a Secret Access Key.
Save the Access Key ID and Secret Access Key as DigitalOcean will not show the Keys again. If you lose them, you have to create a new set of keys, but you cannot retrieve the secret key again later.
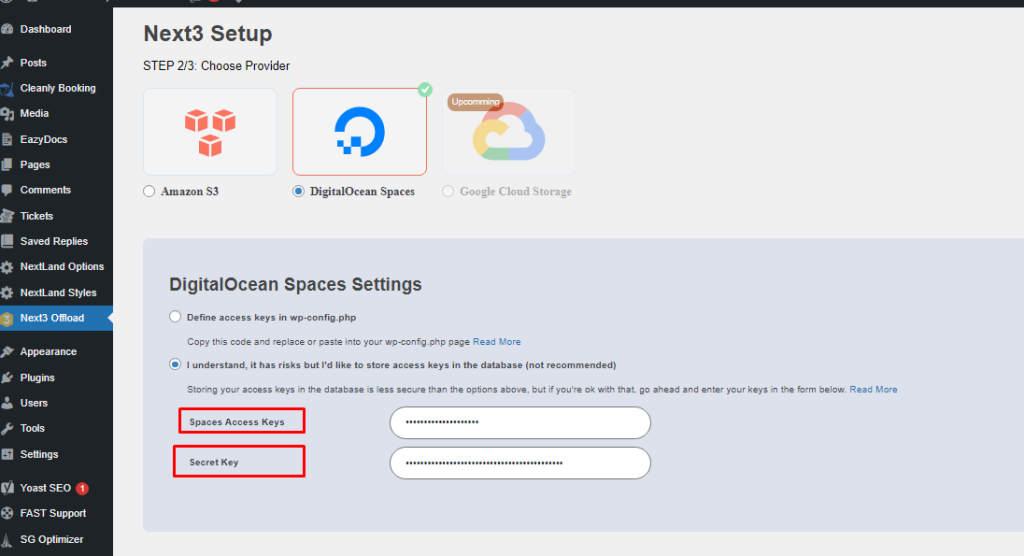
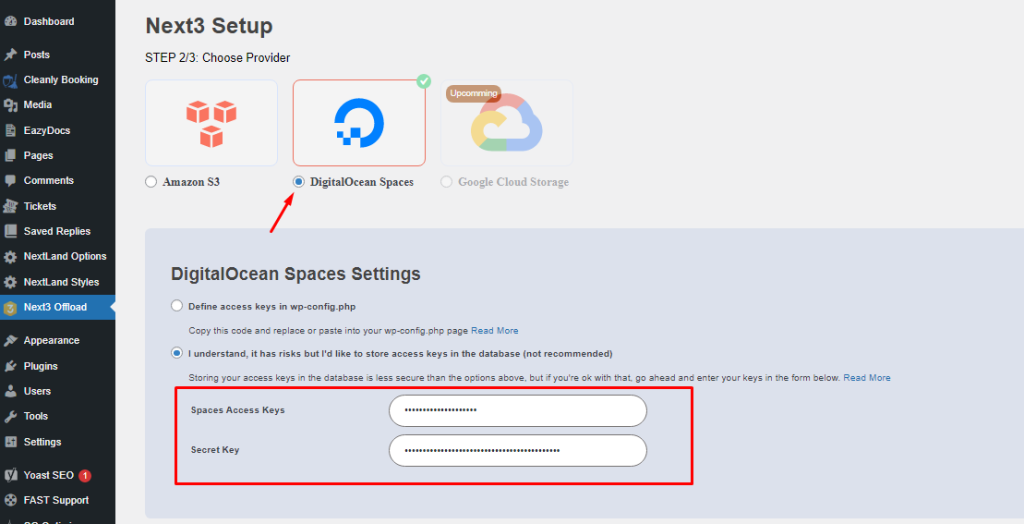
In Next3 Setup, you need to select the provider DigitalOcean and set all the DigitalOcean Spaces Settings by providing your generated Spaces Access Keys as well as Secret Key.
Configure Next3 Offload
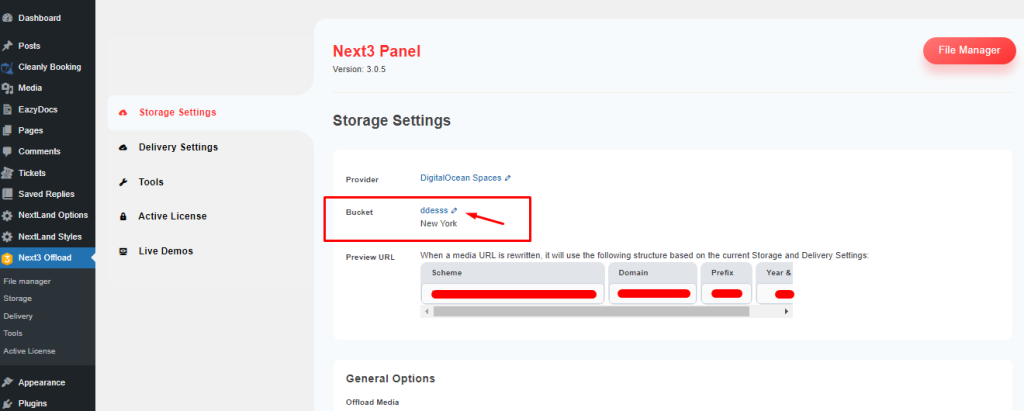
After selecting the provider DigitalOcean, you have to create a bucket or access an existing bucket to offload media files.
For this go for Storage Settings in Next3 control panel and click on edit option beside Bucket.
Step-by-step Procedure to Access the Next3 Offload
The accessing process of Next3 Offload is very smooth and easy. You don’t have to know any coding knowledge to use this plugin. Here we’ll discuss the functionalities of Nex3 offload.
Go for the dashboard portion. In the Next3 control panel you can see Storage Settings, Delivery Settings, Tools, Active license, Live Demo.
Let’s go for the details:
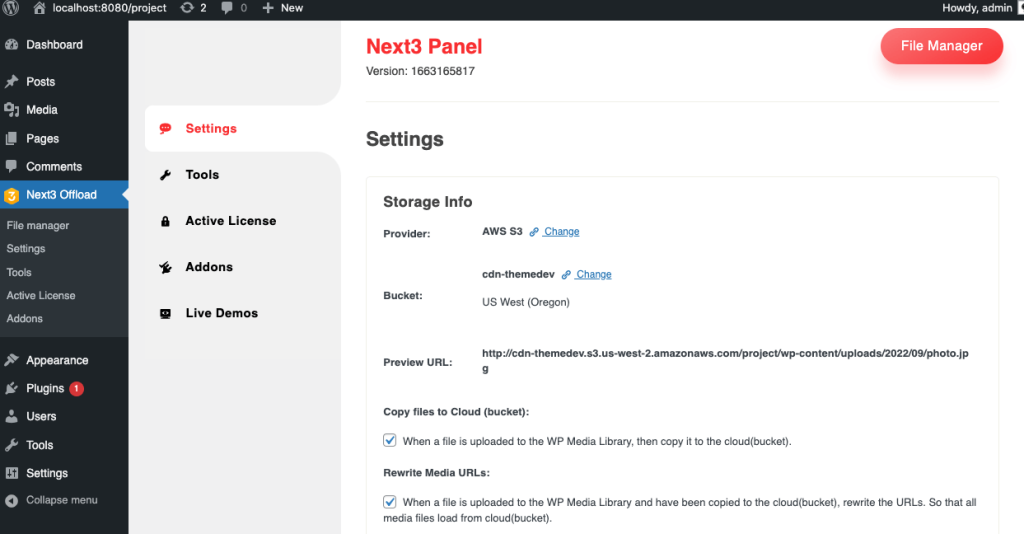
Go to Next3 Offload Media’s settings page in the WordPress admin dashboard, found under the “Settings” menu.
Go to Next3 Offload > Settings
- Storage Info:
- Copy files to Cloud (bucket): Automatically upload files into cloud.
- Rewrite Media URLs: Rewrite your media files into websites
- and Setup your other settings
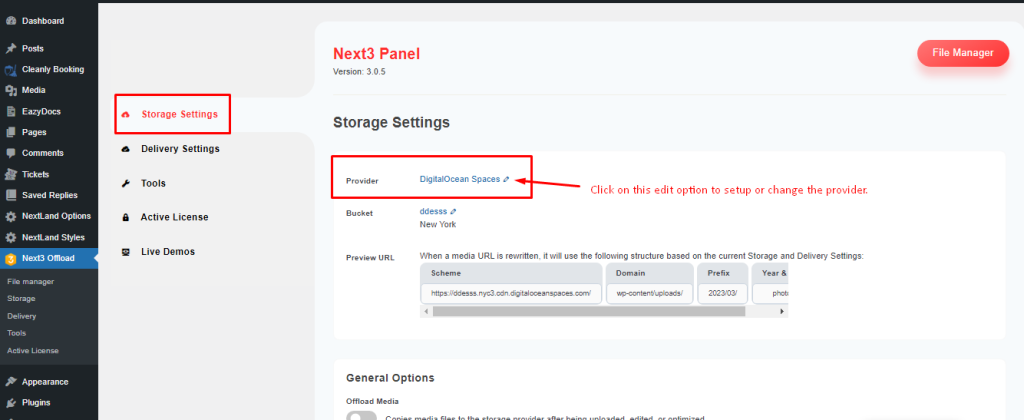
Storage Settings
After completing the installation and activation process of Next3 Offload you will get a perfect control panel. First of all, go for the Storage Settings. From here you can set or edit the Provider. Click on the Edit option.
Edit option will redirect this page where you have to select the required provider and insert the provided and saved Access key and Secret key.
Then go back and click on the Edit option for Bucket settings. You can also go for the File Manager accessing the marked button.

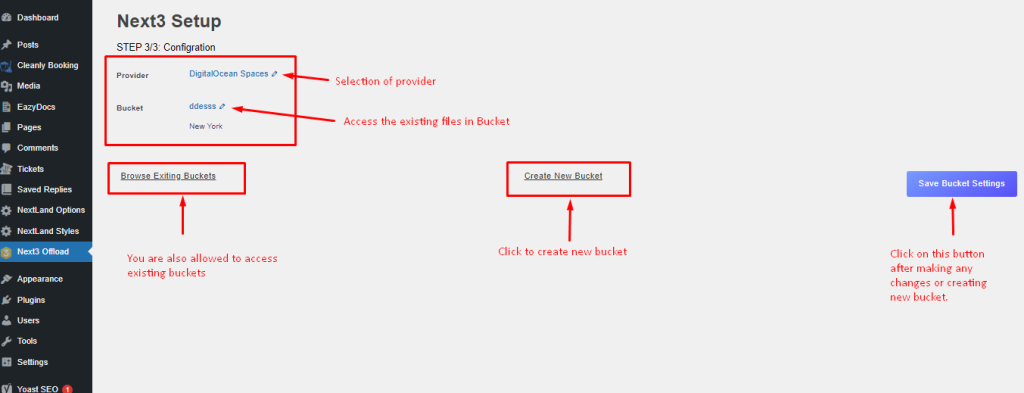
Edit option for bucket will redirect to the following page from where you can create bucket, browse existing bucket, change the provider and select any existing file to the bucket. Always click on Save Bucket Settings after making any changes or creating new buckets.
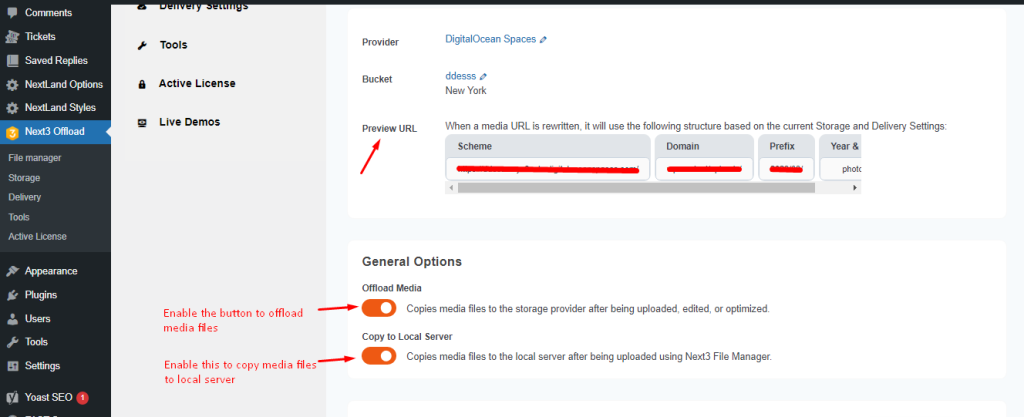
Go back to the Storage Settings page. Here you can see the Preview URL.
In General Options, Turn ON the button of Offload Media files to the storage provider.
Also here is the option to Copy to Local Server, turn it ON if you want to copy the media files to the local server after being uploaded.
Now, you can set up the bucket path. To add Prefix, Turn ON the following button. After adding Prefix for adding year and month enable the button of Add Year & Month The Bucket Path. Similarly, you can add time as minute to the bucket path after year and month by enabling the option Add Object Version to The Bucket Path.

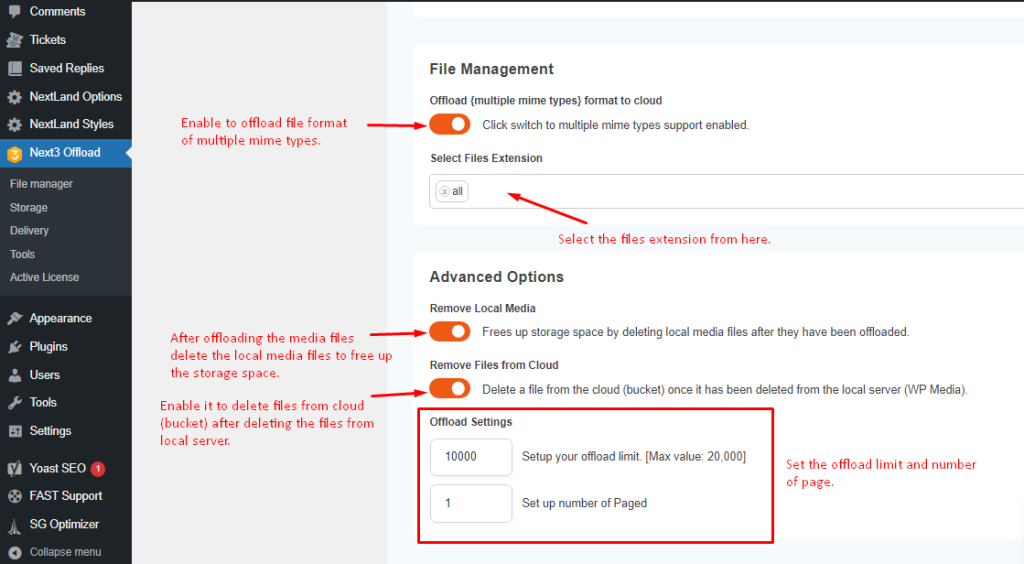
In File Management you can offload multiple mime types of file format to the cloud. For doing that Turn ON the required option. Here you also have to select the file extension.
You can free up the storage space by removing the local media files enabling the button of Remove Local Media.
You can also delete the files from cloud( bucket )after uploading the files by Turning ON the button for Remove Files From Cloud. Here are fields for selecting the offload limit and the number of pages.
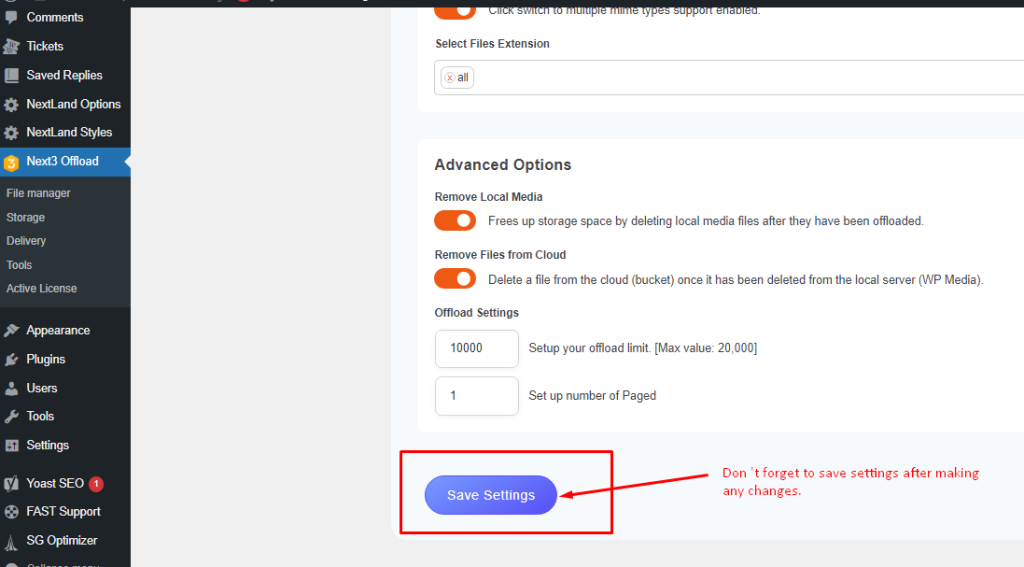
Always remember to Click on the Save Settings button after making any changes.
Delivery Settings
Now go for Delivery Settings and select the delivery provider as you need. After that you can also enter a custom domain name in the required field.
In General Option, you can rewrite the media URLs. And enable the option of Force HTTPS if you want to use HTTPS for every offloaded media item instead of using the scheme of the current page.
Force CDN Delivery also allows you to offload media files by rewriting URLs from selected Delivery Providers always. After completing all changes click on the Save Settings button.
Tools
Below the Delivery Settings you can see the Tools section. From Here you can offload your existing media files and also can see the percentage of files contained in Cloud storage and local storage.
You can offload both individual and multiple media files by accessing the option for Individual Offload Existing Media.

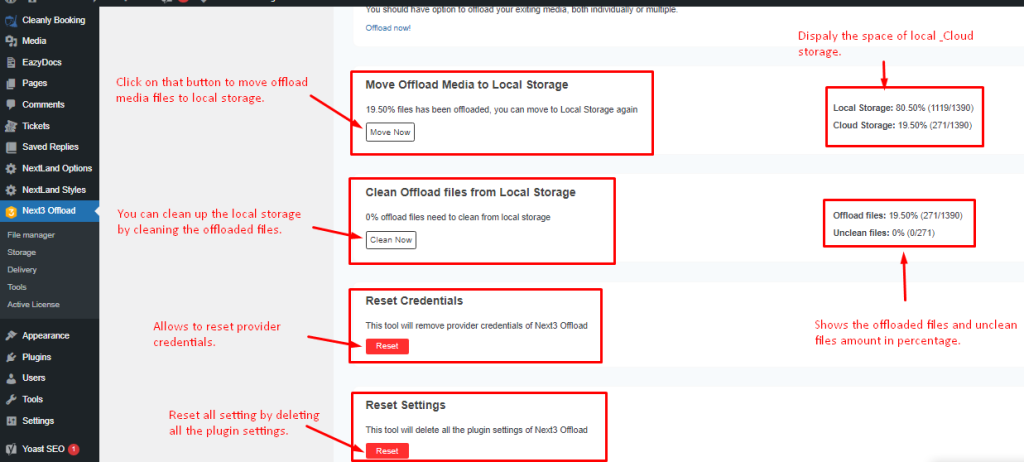
Go for Move Offload Media to Local Storage for moving the media files to local storage.
This portion also has a section to display the percentage of files in Local storage and Cloud storage.
If needed you can also clean the offloaded files in local storage by accessing Clean Offload files from Local Storage. Here unclean files and offloaded files are also being shown.
You also can see the option for Reset Credentials and Reset Settings.
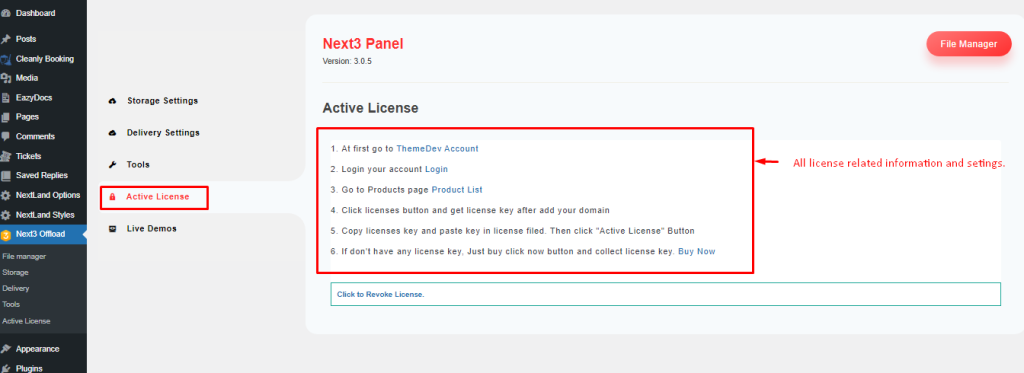
Active license
Here is the portion for the Active license. All licenses regarding options are available in this portion. Access anything that you need.
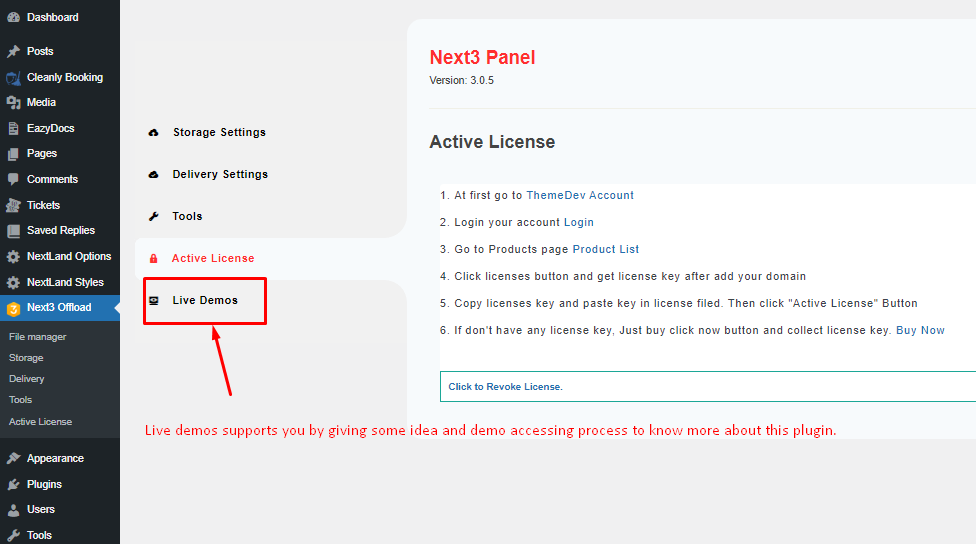
Live Demo
Click on Live Demo and you will be able to access the plugin’s feature as a demo. It will help you to make a clear vision of the effective features of this amazing plugin.
Final Words
Offloading WordPress media files is a smart and effective way to optimize your website’s performance, speed, and scalability. With a WP offload media plugin, you can easily store your media files on an external server and reduce the load on your WordPress hosting server, leading to faster loading times and a better user experience.
We hope this blog has provided you with a clear understanding of the benefits of offloading media, how the plugin works, and the step-by-step process to get started with offloading your media files in WordPress. By implementing offloading, you can take your website to the next level and provide a better browsing experience for your users. So go ahead and give it a try today!
And don’t forget to subscribe to CatFolders video channel to stay updated on the latest features, explore creative use cases, and get inspired to take control of your WordPress media library.
Muaaz
Next3 Offload plugin is a scam, the product does not work and they rip people off there support is awful.