Ever felt the pressure of a ticking timer nudging you to make a quicker decision? It’s amazing how those countdowns can push you to hit “Buy Now” faster than you planned. That called the magic of FOMO (Fear of Missing Out).
In this article, we are going to show you the easiest way to create multiple countdown discount sales banners in WooCommerce.
Before we begin, let’s have a clear understanding of using a countdown discount sales banner.
Table of Contents
Why Should Use Countdown Banner in WooCommerce Store
Here are a few reasons why you should have a countdown timer for your discount sales:
Boost Sales & Conversion Rates
A countdown timer creates a sense of urgency, prompting customers to make a purchase before time runs out. This urgency reduces hesitation and significantly increases the chances of conversion.
Enhance User Experience
Countdown banners add excitement and anticipation to your website. They engage visitors by highlighting your discount sales, and they guide users to make purchases by providing easy access to coupon codes or direct links to product pages.
Create a Sense of Exclusivity
A countdown timer can make your sale feel exclusive and limited, which can attract more customers. When visitors see that the offer is only available for a short time, they may feel like they’re getting access to something special, increasing their likelihood of making a purchase.
Brandy Blocks can help you easily add a countdown timer to your homepage, enhancing your web design and creating a sense of urgency for visitors.
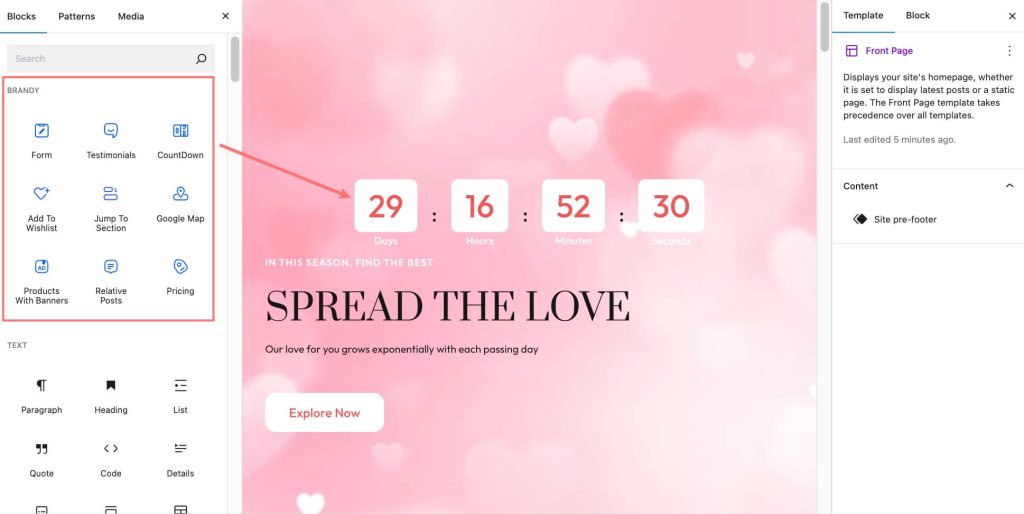
However, if you’re looking for a plugin that’s more specifically focused on optimizing your sales campaign, I’m going to guide you through the process of setting it up to maximize its impact.
Display Multiple Sales Countdown Banner in WooCommerce with YayPricing

To create WooCommerce sale banners with countdown timers, you’ll need an extra plugin. A great choice is YayPricing, one of the top WooCommerce dynamic pricing plugins with more than 7+ dynamic pricing rules, 20+ conditional logics, and so on. It comes in both free and paid versions, but the countdown banner feature is exclusive to the premium version of this Woo discount rules plugin.
YayPricing allows you to create and display multiple sales countdown banners at the same time easily without the need for technical complexity.
Now, follow these steps to set up WooCommerce countdown banners with YayPricing:
Step 1: Install and Activate YayPricing
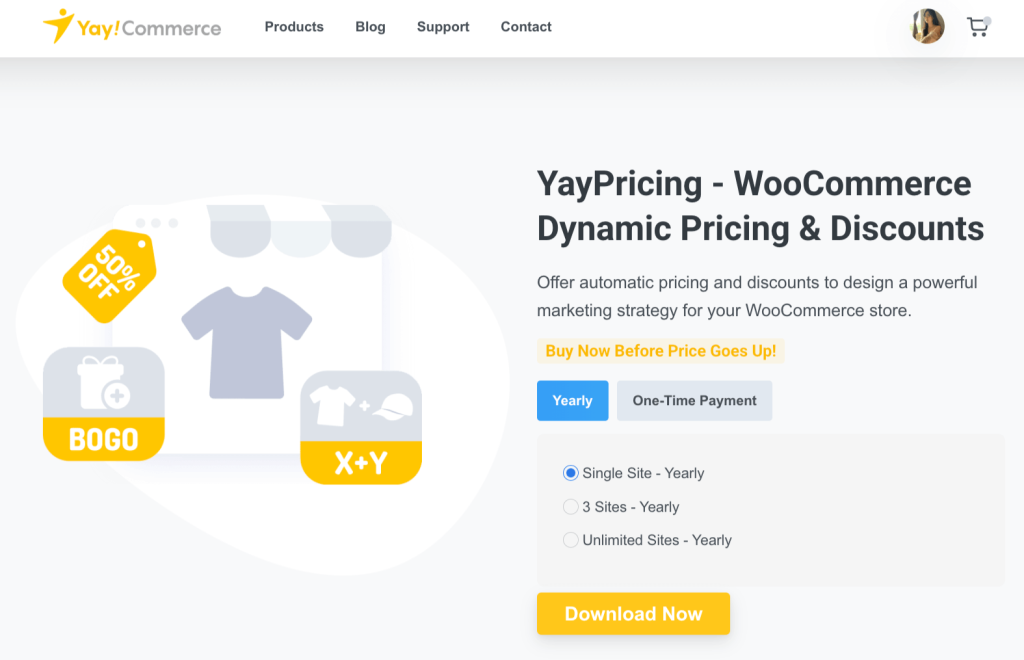
Start by purchasing the Pro version of YayPricing from the YayCommerce website and downloading the plugin in .zip format.
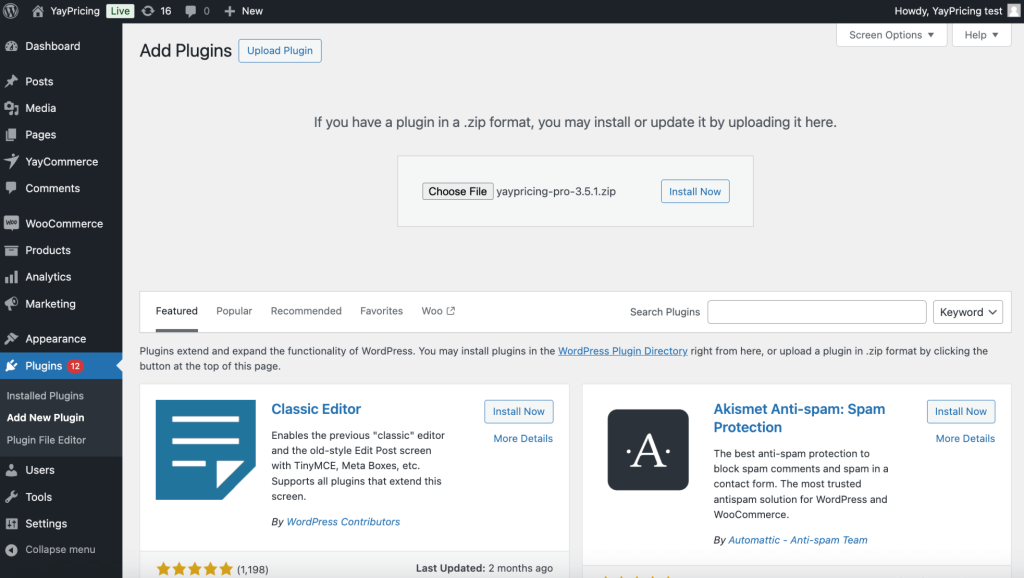
Once you have the file, log in to your WordPress dashboard, then go to Plugins > Add New. Click on Upload Plugin, choose the zip file you downloaded, and click Install Now.
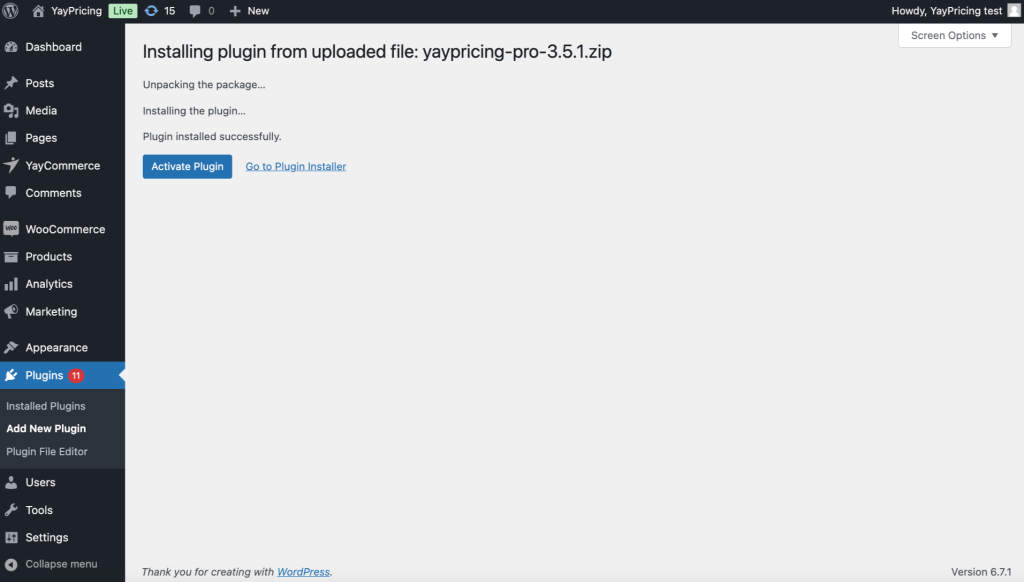
After installation, activate the plugin by clicking Activate Plugin.
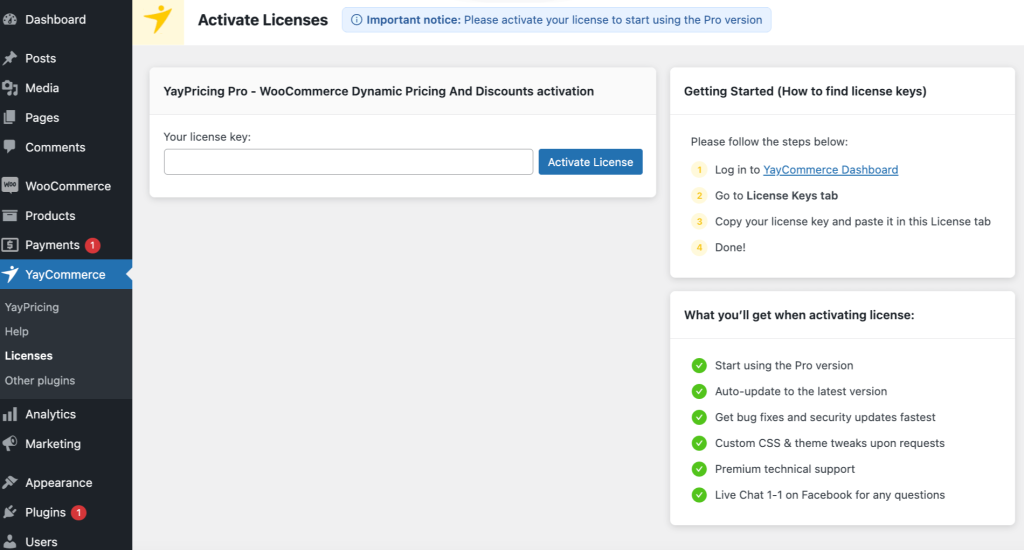
To activate your YayCommerce product license, first log in to the YayCommerce website and navigate to the License Keys tab within your account dashboard.
Here, you’ll find the license keys for the products you’ve purchased. Copy the relevant license key, then head to your WordPress dashboard and paste the license key into the provided field.
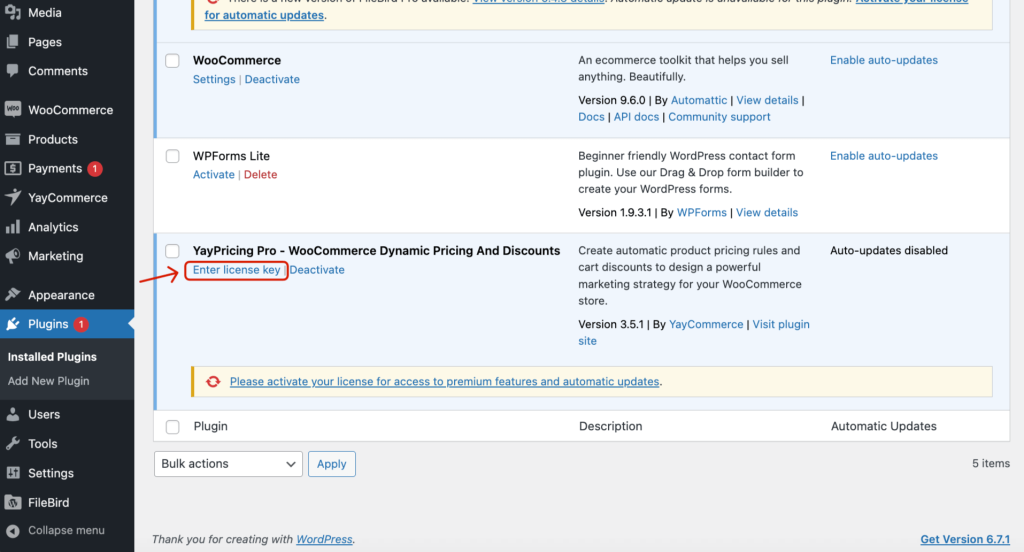
Finally, click the Activate button to apply the license and unlock the full features of the YayCommerce product you’re using.
Step 2: Creating WooCommerce Sale Campaigns Discounts
Before setting up the countdown timer, you’ll need to put some products on sale.
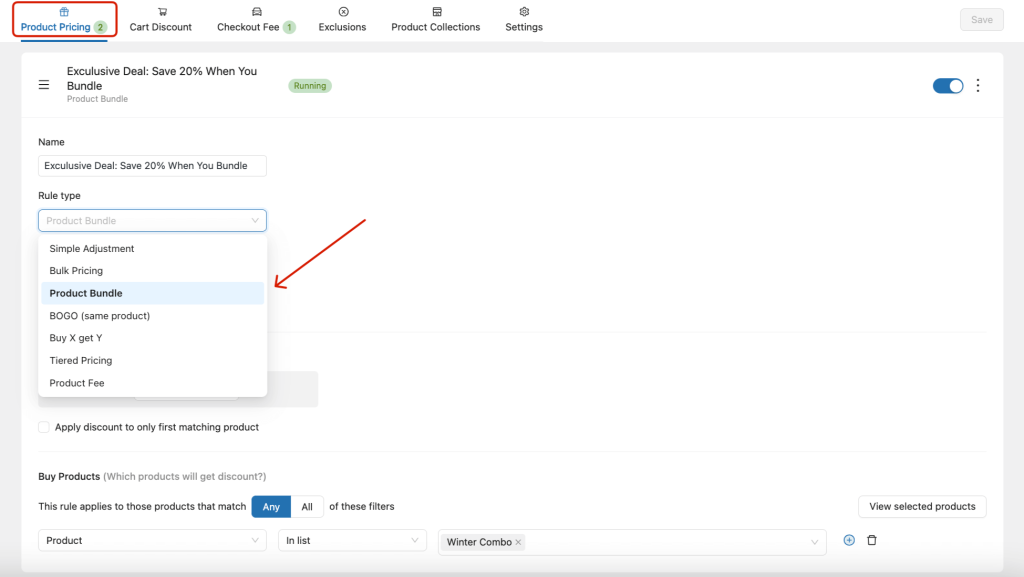
From your admin dashboard, head to YayCommerce > YayPricing
In the Product Pricing tab, you can create customized pricing rules for your products, such as:
- Bulk pricing
- Product bundle
- BOGO
- Buy X get Y
- Tiered Pricing
- Product fee
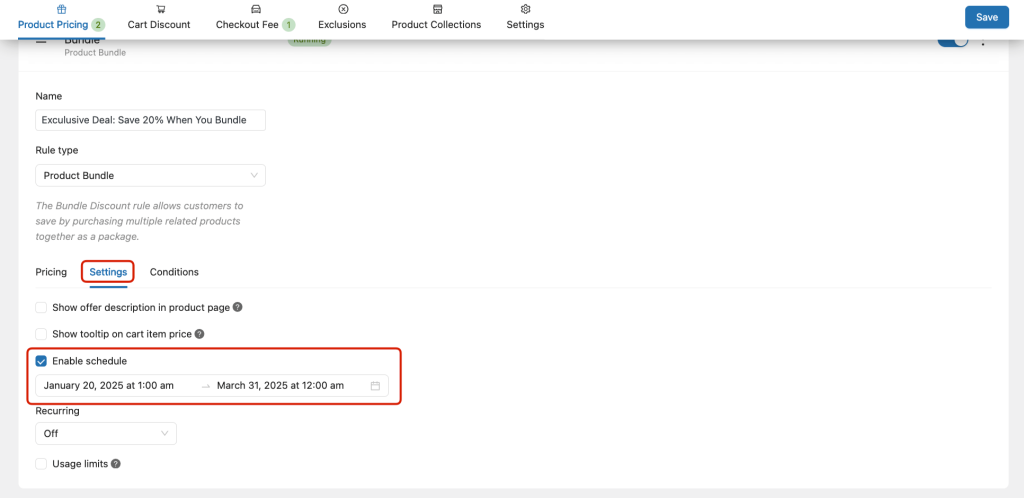
Look for the Settings tab in the rule configuration.
Tick the checkbox to enable schedule, this allows you to set specific start and end dates for the rule to be active. Once enabled, you can also define particular time settings if needed, making it perfect for managing flash sales or time-limited discounts.
Besides Product Pricing, you can also create discounts at the Cart and Checkout steps.
Apply discounts based on the cart total, product quantity, or specific conditions like coupon codes. For example, “Get 10% off on orders over $50” and so on.
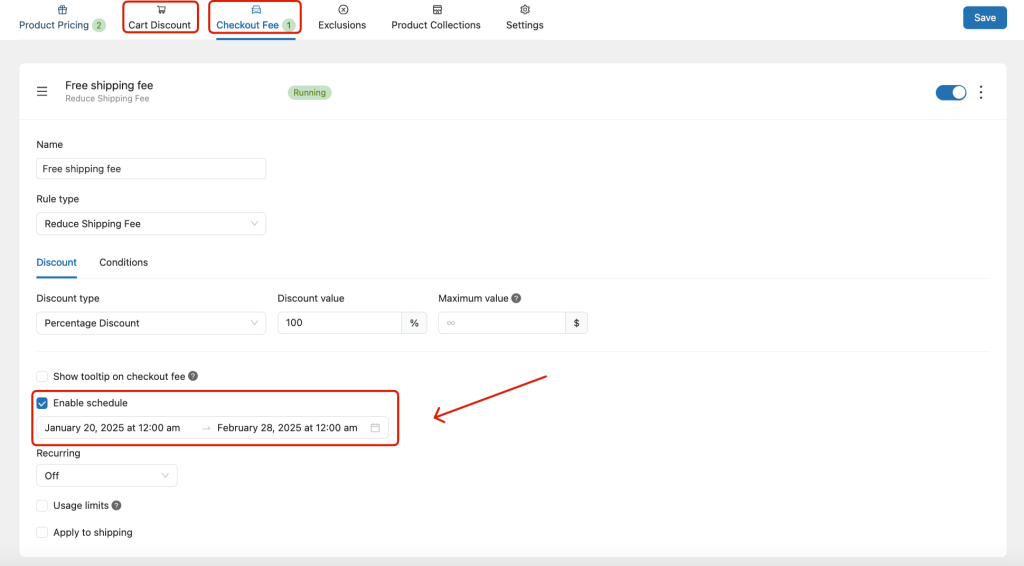
YayPricing allows you to create as many discounts as you want, giving you the flexibility to design multiple pricing rules and promotions tailored to your store’s needs.
Step 3: Configuring the WooCommerce Sale Banners
The final step is to set up WooCommerce countdown banners. To do this, move to the Settings tab, scroll down to find Countdown timer.
From there, you can customize the appearance of the banner.
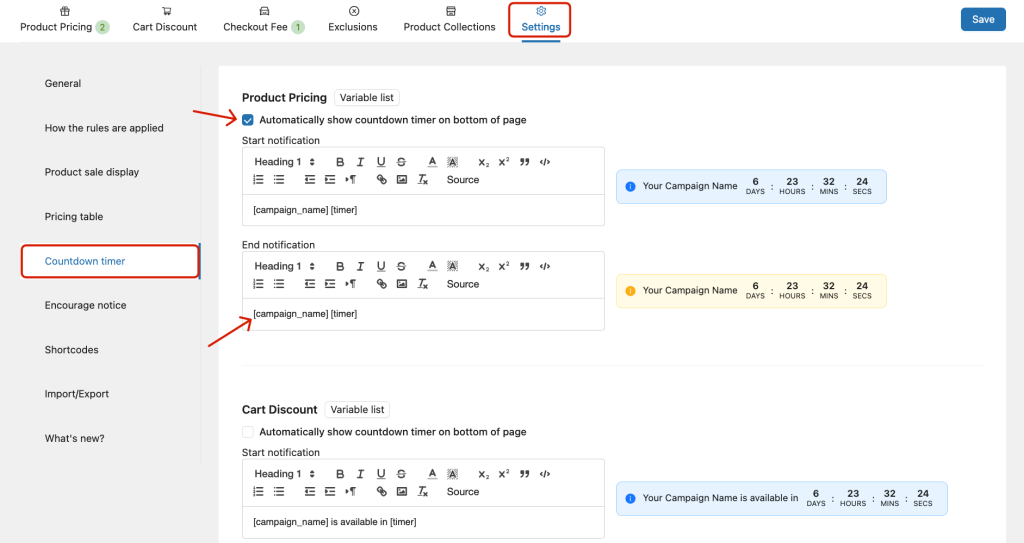
Remember to tick the checkbox “Automatically show countdown timer on bottom of page” and Save button to apply the changes.
One special feature of YayPricing is sticky countdown banners, which stay fixed at a specific position on the screen as users scroll. This ensures the sale banner remains visible, continuously attracting the customer’s attention and increasing conversion rates without being overlooked.

Best Practices to Use WooCommerce Countdown Timers in Your Store
WooCommerce countdown banners are a proven way to drive sales for both online and offline stores. Featuring a live timer, these banners create a sense of urgency, highlighting the time left for a deal.
- Highlight Time-Sensitive Offers
Use countdown banners for flash sales, seasonal promotions, or exclusive discounts.
Example: “Hurry! 50% off ends in 24 hours!”
Why It Works: Creates a sense of urgency, encouraging immediate action.
- Promote Limited Stock
Combine countdowns with inventory alerts like “Only 5 left in stock!”
Example: “Stock running out! Offer ends in 2 hours!”
Why It Works: Appeals to customers’ fear of missing out (FOMO).
- Seasonal and Holiday Campaigns
Use festive-themed countdowns for holidays like Christmas, Valentine’s Day, or Back to School.
Example: “Holiday Sale ends at midnight! Don’t miss out!”
Why It Works: Aligns with customer shopping behavior during peak seasons.
- Checkout Countdown
Display a countdown during the checkout process to secure the deal.
Example: “Complete your purchase within 10 minutes to keep your cart!”
Why It Works: Reduces cart abandonment by pushing customers to act quickly.
- Free Shipping or Rewards Deadline
Tie the countdown to offers like free shipping or loyalty rewards.
Example: “Free shipping ends in 3 hours!”Why It Works: Provides additional motivation to meet the conditions before time runs out.
To Sum Up
And that’s a wrap! We’ve come to the end of this quick guide on WooCommerce countdown banners for multiple sales. By leveraging countdown banners, you can create urgency, increase conversions, and drive sales for your WooCommerce store. It’s all about strategically timing your promotions and presenting them in a way that captures attention and motivates action.
If you found this guide helpful, feel free to share your thoughts in the comments! We’d love to hear your feedback.
For more tips and tutorials, don’t forget to visit our YouTube channel! Subscribe and stay updated with the latest content to help grow your WooCommerce store.