If you run a WooCommerce store, you already know how important it is to track your profits accurately. But here’s the tricky part – you can’t really know how much you’re earning until you know how much each product costs you to sell.
That’s where COGS (Cost of Goods Sold) comes in!
In recent updates, WooCommerce has introduced a built-in COGS feature, allowing store owners to manage product costs and view real profit directly from the dashboard – no extra plugin needed.
In this guide, we’ll walk you through how to use the COGS feature step by step, and we’ll also compare it with some popular third-party COGS plugins so you can decide which option fits your store best.
Table of Contents
What is COGS and Why It Matters
COGS stands for Cost of Goods Sold, which is basically how much you spend to produce or purchase a product before selling it.
For example, if you sell a T-shirt for $25, but it costs you $10 to buy or make it, your COGS is $10, and your gross profit is $15.
Tracking COGS helps you:
- Know your actual profit margin
- Price your products smartly
- Spot low-margin items before they hurt your business
- Get clearer financial reports for better decision-making
How to Use Cost of Goods Sold (COGS) Integration in Core WooCommerce
WooCommerce’s new COGS feature is surprisingly simple to use. Here’s a detailed step-by-step guide to help you set it up and start tracking your costs right away.
Step 1: Enable the COGS feature in WooCommerce
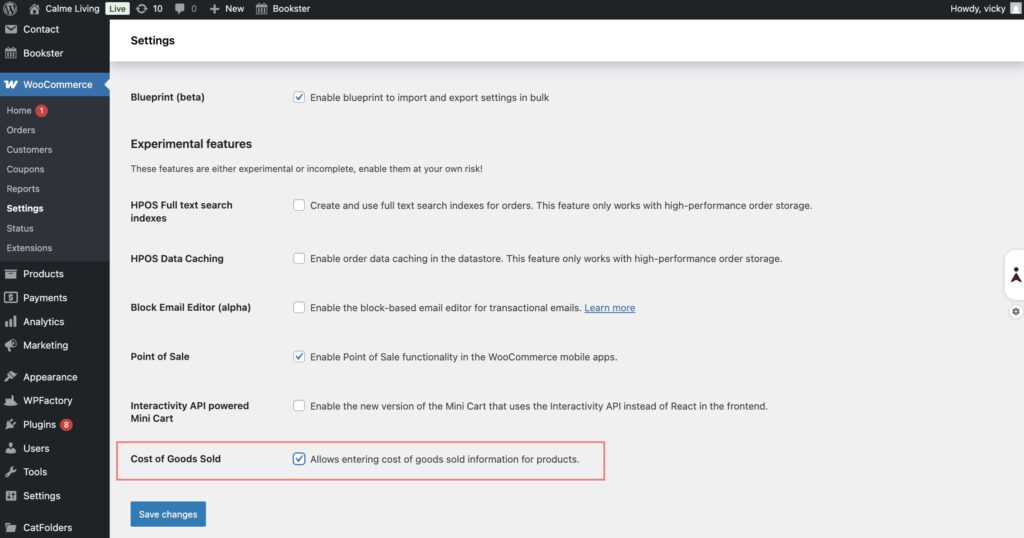
On your WordPress dashboard, navigate to WooCommerce > Settings > Advanced > Features. You have to find the Cost of Goods Sold option and enable it.

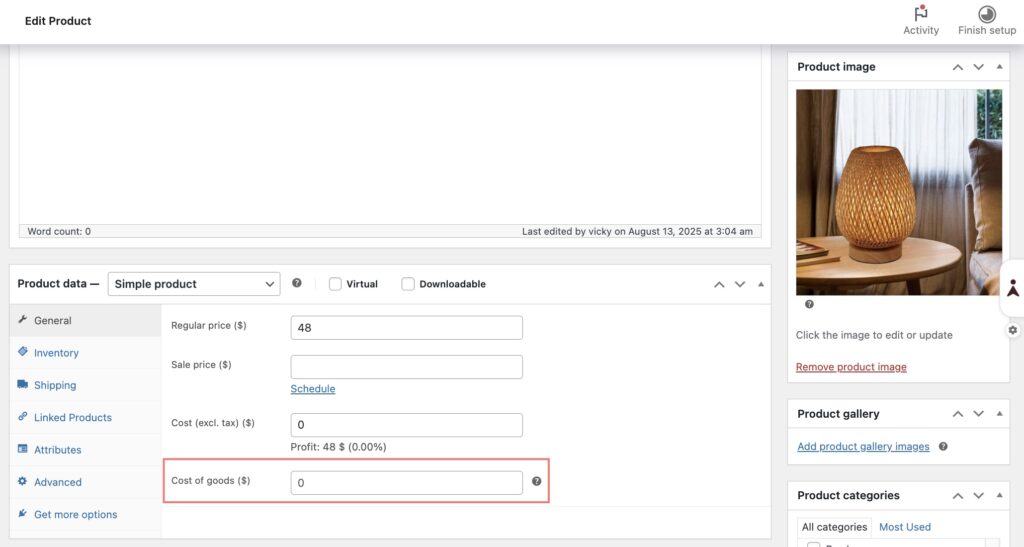
Once you do this, WooCommerce will automatically add a “Cost of goods” field to all your product edit screens.
Step 2: Add Cost to Simple Products/Variable Products
Now that the feature is enabled, it’s time to fill in your product costs. Access to edit specific Products. Scroll down to the Product data section. Also, if your store sells products with variations (like sizes, colors, or materials), each variation may have a different cost.
Under the General tab, look for the new Cost of Goods field. Enter the actual cost for that product. Then, click Update.

Be realistic when entering your cost. Include all the “hidden” expenses – packaging, import duty, shipping, etc. The more accurate your cost, the more reliable your profit reports will be.
Step 3: Bulk Update Product Costs (For Large Inventories)
If you have hundreds or thousands of products, updating costs manually could take forever!
Good news: WooCommerce’s CSV Importer can save the day.
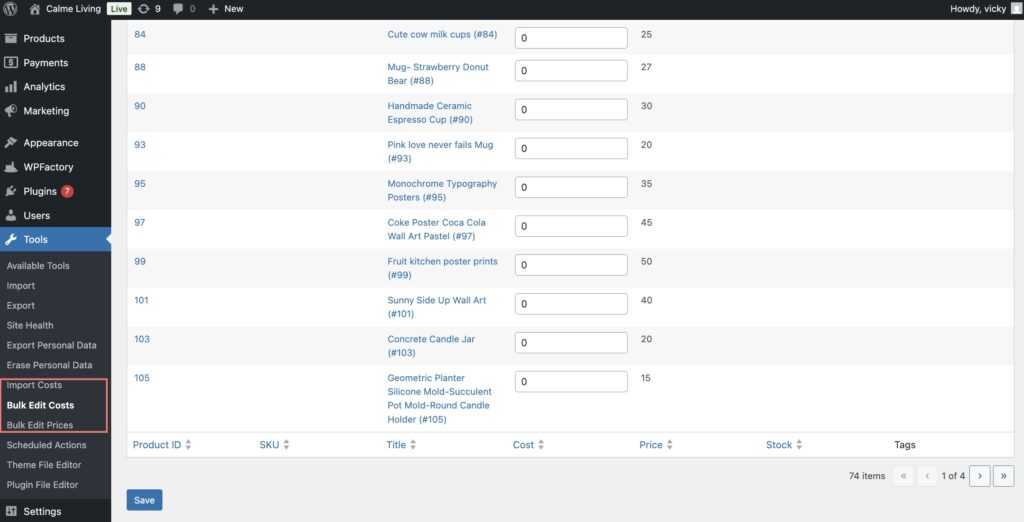
Go to your WordPress dashboard > navigate to Tools > Bulk Edit Cost.

As you can see the image above, you can edit the cost, price, and stock of all your products in your store, making it easier and faster to manage these details from a single page.
WooCommerce will automatically assign the costs to the right products. It’s quick, efficient, and perfect for stores with large catalogs.
Step 4: See Costs and Profits in Your Orders
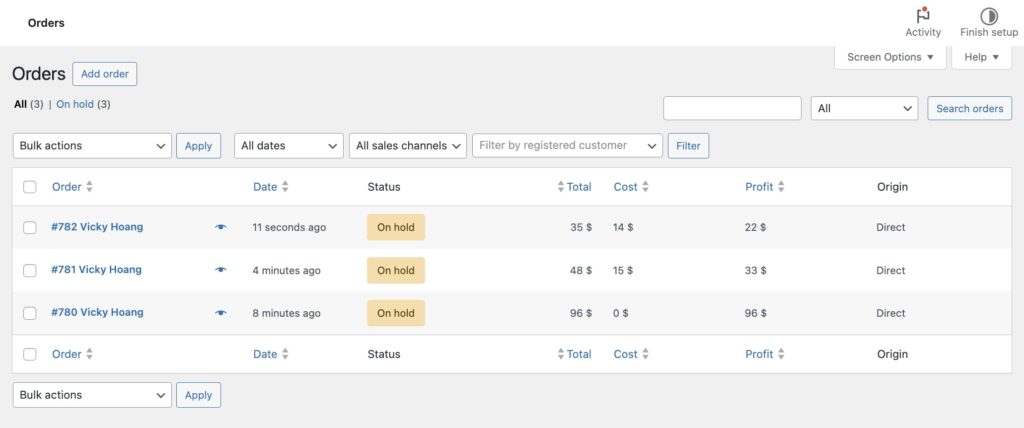
Once your products have cost values, WooCommerce automatically calculates the COGS whenever an order is placed.

With this feature, you can manage each order and the product’s cost at the time of sale. You can see gross profit per order right inside your dashboard. Even if you update a product’s cost later, WooCommerce keeps the old cost saved for past orders.
This gives you an accurate, historical view of your profitability, which is very handy when reviewing monthly or quarterly performance.
Pro Tips for Using WooCommerce COGS Effectively
- Keep costs updated: Supplier prices can change – update your cost fields regularly.
- Use consistent units: Always use the same currency or conversion rate for consistency.
- Include all related costs: Don’t forget shipping, packaging, or import taxes.
- Export and review monthly: Download reports to see how your profit trends over time.
- Integrate with accounting tools: If you use QuickBooks or Xero, connect your data for smoother bookkeeping.
Bonus: WooCommerce Core COGS vs. Third-Party Plugins
Let’s compare WooCommerce’s new built-in feature with some popular third-party COGS plugins – like Cost of Goods for WooCommerce or Advanced WooCommerce Reporting.
| Feature | WooCommerce Core COGS | Third-Party Plugins |
| Add product/variation costs | Yes, built-in field | Yes, often more advanced (multiple cost layers) |
| Bulk import costs | CSV import supported | CSV import supported |
| Order-level cost tracking | Automatically records cost per sale | Same, sometimes with recosting tools |
| Profit & margin reports | Basic, clean reports | Advanced charts, breakdowns, and export tools |
| Multi-currency support | Basic | Full support for multiple currencies |
| Performance | Lightweight | Adds plugin load and updates |
| Integration with accounting systems | Possible via API | Built-in integrations for Xero/QuickBooks |
| Price | Free (included with WooCommerce) | Paid (from $39–$99/year) |
Wrapping It All Up
WooCommerce’s new COGS integration is a huge quality-of-life upgrade for store owners. It’s clean, simple, and built directly into your dashboard, making it easy to track costs and profit without extra plugins.
You can now:
- Track how much your products really cost
- Measure true profit per order
- Make smarter pricing and inventory decisions – all without installing another plugin!
If you’re running a large or multi-channel business, you can always extend WooCommerce with a dedicated COGS plugin later. But for most stores, the built-in version is a clean, fast, and effective solution.
So go ahead – turn on the feature, add your costs, and start watching your profit reports come to life.